


SOS: Sluggish/stuck fermentation

Many a winemaker has lamented the dreaded stuck fermentation. With so much to deal with during harvest time, the last thing you should be worried about is a ferment that has just up and quit. But sometimes it happens – knowing what to do when it does will be a life saver during an otherwise potentially unfortunate moment in a wine’s life. We’re here to walk you through how to handle this, what to do, and most importantly, how to do it.
Step 1: Think about why it may have gotten stuck
This is going to help you moving forward, both with this wine and with future ferments. Was there too much sugar in the juice or must to begin with? Was the fermentation temperature too cool or too hot? Did you choose a yeast that doesn’t do well with high sugar levels? Were nutrient levels too low?
Considerations before restarting
- Adding lysozyme can halt spoilage organisms which are often present in sluggish or stuck fermentations
- Resuke can lower toxin levels that have accumulated which will give you a better chance for a healthy restart. If you add this you will rack off of it 1-2 days later.
- Incorporate Go-Ferm and Go-Ferm Protect Evolution to ensure health of ensuing restarting fermentation
- Carefully choose what yeast you will re-pitch with. 43, 43 Restart, Fermivin Champion, K1 (V1116), Vin 13, BC, and DV10 are great choices.
Step 2. Add a complex yeast nutrient
This is going directly into the stuck wine tank. If you think you may have a spoilage bacteria problem, this is the time you would be adding lysozyme.
Step 3. Combine equal parts stuck wine and water in another vessel
This is known as the “mother restart tank.” At this moment it will be totaling 2% of whole volume.
Step 4. Rehydrate yeast nutrient + yeast as you would when pitching yeast the first time
This is the exact same process you did during the initial yeast pitch.
Step 5. Add the yeast to the mother restart tank
As always, there should be a <18F difference between the yeast mixture and the mother restart tank liquid temperature.
Step 6. Add 10% of the stuck wine to the starter culture
Wait 20-30 minutes.
Step 7. Add 20% of the stuck wine to the starter culture
Wait 20-30 minutes.
Step 8. Repeat until the remainder of the stuck wine has been added to the mother restart tank
Don’t skimp on waiting the 20-30 minutes at each of the following steps. Give it time to acclimate!
LODI RULES in Sustainable Farming

So, you want to learn more about Lodi wine region?
Are you are interested in California wine? If so, chances are you’ve been on the up and up with what’s happening in Lodi. A fantastic climate, strong traditional roots, and multiple generations of winegrowers are paving the way for sustainability measures. This has led to the creation of the LODI RULES seal, a green stamp appearing on the back labels of certified wines much as you would find a “USDA Organic” sticker. Click here to see which of our Lodi wine grapes are LODI RULES certified –> LODI RULES – Musto Wine Grape
As California’s original sustainable viticulture certification program, this seal is representative of a producer’s commitment to stewardship and respect for the land. It is a symbol of transparency in all things related to sustainable viticulture. The certification does not approve only one aspect of winemaking. It looks at the whole of the process, from farm to vine to bottle. While over 150 wines bear the LODI RULES seal, not just any winery can use this seal on their labels. The wines must have 85% certified sustainable grapes and be able to prove this. This then gets confirmed through third party accreditation and auditing.
There are two layers to the accreditation
1. Wineries must agree to “The Standards” of the certification, which include 100+ sustainability measures, in addition to following a unique pesticide risk model. The Standards are comprised of sustainability related to
- business
- human resources
- ecosystems
- soil
- water
- pests
2. Wineries must follow the Pesticide Environmental Assessment System (PEAS), used to gain an understanding of the impact of pesticide use within the vineyard. This is then used to generate a quantifiable environmental impact unit through which the effects and range of pesticide application can best be understood within the local ecosystem.
The Lodi AVA is setting a fantastic example by supporting the land that retains some of this country’s oldest vines. Lodi Rules is imparting a new standard in its meticulous regulations, leading other wine regions following suit after realizing how successful this certification has been for the region. Keep up to date with the progressive measures this winemaking region is taking to best care for their land, and be sure to look for the LODI RULES label on your next Lodi bottle. And this fall, be sure to find your very own Lodi wine grapes here at Musto Wine Grape Co.
The Winemaker’s Think Tank: Vol 30 – How do I test for pH?

What’s the Winemaker’s Think Tank?
Every Thursday we will post about a few frequently asked questions that our winemaker has answered. If you have a winemaking question you would like to have answered, please email us at support@juicegrape.com and we will try to get into next week’s post. Cheers! 🙂

How do I test for pH?
Testing for pH is a reasonably simple process for your wine. Based on your budget, you can obtain a variety of pH measuring implements. There are pH test strips that will give you an approximate level of pH in your wine. They give a color reaction that when compared to a chart, indicates the pH of the wine. The next level up in sophistication as well as price is a basic pH meter. Musto wine grape offers a simple handheld pH meter that can be calibrated in a matter of minutes and gives precise and accurate pH readings. The probe must be stored properly in a storage solution to ensure that it does not dry out. The probe lasts from 12-18 months, depending on its care and must be purged after this time frame. With the most basic model, you throw out the entire unit and buy a new one. With the more sophisticated models of pH meters, the probe is replaced separately from the unit (which should last indefinitely).
We hope this information helps with your winemaking. If you have any follow up questions or winemaking questions in general, please email us at support@juicegrape.com.
The Winemaker’s Think Tank: Vol 26 – How do I test for Acid?

What’s the Winemaker’s Think Tank?
Every Thursday we will post about a few frequently asked questions that our winemaker has answered. If you have a winemaking question you would like to have answered, please email us at support@juicegrape.com and we will try to get into next week’s post. Cheers! 🙂
How do I test for Acid?
When testing for acidity in wine, you are looking for the Total Acidity value, or the amount of acids in grams per liter of wine. While this may sound complex, it will help you in achieving a proper balanced flavor in your end product. You will need a few basic lab supplies: a test tube, a small 10ml graduated syringe, phenalthalein, sodium hydroxide. Draw a 15ml sample of the wine to be tested into the test tube. Add three drops of the phenalthalein. Swirl the drops around in the wine to mix it in thoroughly. (Note: When using sodium hydroxide, be very careful. It is a strong base that can cause burns. We suggest wearing eye and skin protection.) Using the 10 ml graduated syringe, slowly drop in the sodium hydroxide by .5ml at a time. Every drop, swirl the test tube contents to mix and observe any color reactions. Upon adding the drop, you will see an immediate color change, that will then dissipate. For white wines, you will observe a pink color and for red wines you will observe a grey color. Keep repeating the process of adding a drop, swirling and observing until the color change is permanent. The amount of sodium hydroxide used, when the color change is permanent, will give you the Total Acidity. If 6ml of Sodium Hydroxide are used, then the wine contains .6% or 6g/L of TA.
We hope this information helps with your winemaking. If you have any follow up questions or winemaking questions in general, please email us at support@juicegrape.com.
The Winemaker’s Think Tank: Vol 18 – Tips for Racking Your Wine

![]()
What’s the Winemaker’s Think Tank?
Every Thursday we will post about a few frequently asked questions that our winemaker has answered. If you have a winemaking question you would like to have answered, please email us at support@juicegrape.com and we will try to get into next week’s post. Cheers! 🙂
The Joys of Racking Wine….
Racking your wine is a necessary evil. We know it can be tedious, but it the end it is so worth it.
Things to keep in mind when racking:
• Cleanliness: We cannot express this enough. The cleaner your cellar, the less risk you have of spoilage, the better your wine will be. Aka SANITIZE EVERYTHING!! (however if doing MLF rinse with hot water as not to kill the ML bacteria) Use a solution of potassium metabisulfite dissolved in warm water. Add 2 tbsp to a 5 gallon bucket of water. Make sure that everything that will touch your wine (siphon, hosing, carboys, stirring rods) are all rinsed with this solution. Do not rinse it off with water, just shake off any excess droplets.
• Primary Racking: Rack after your primary alcoholic fermentation is complete. This protects your wine from any initial microbial fermentation issues. Getting the new wine off of the dead yeast cells in important for the health of your wine to prevent off aromas.
• Secondary Racking: Rack after the Malo-Lactic fermentation has finished. At the second racking you will want to rack your wine into an aging vessel. Whether that is a stainless steel tank or an oak barrel. Don’t forget to sulfite, unless you are doing MLF.
• Third and/or Fourth Racking is used more for clarification purposes. Solids and fining agents (if used) will fall out of suspension and form a layer on the bottom of your aging vessel. Racking every 2-3 months, will consistently clarify your wine.
• Using a pump makes life so much easier. You can pretty much sit back and relax with a glass of wine while your juice is being transferred. If you don’t have a pump the best way to rack is by using a siphon and the gravity method. Put the primary vessel up some place high (a table) and rack into your new vessel on a lower surface (floor).
We hope this information helps with your winemaking. If you have any follow up questions or winemaking questions in general, please email us at support@juicegrape.com.
Chilean Wine Grape Update: Arrivals & In Stock

As of 5/2/2017 the following is in stock…
Juices:
ALL Chilean Varieties
ALL South African Varieties
Grapes:
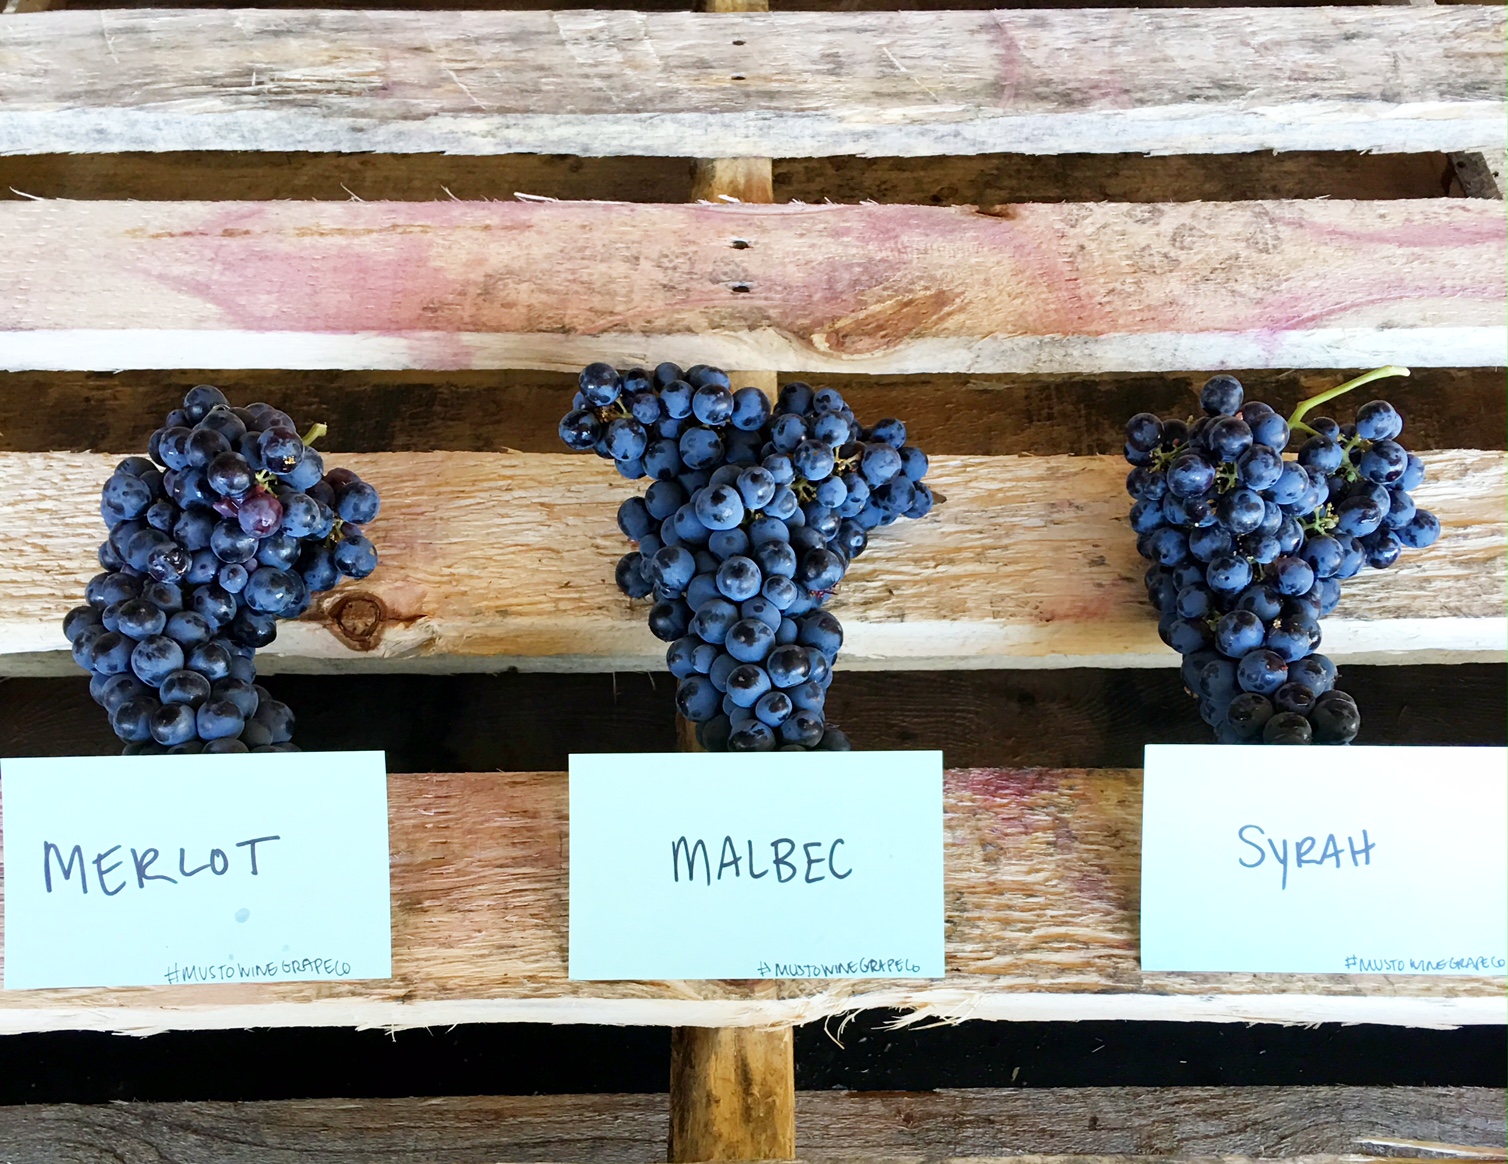
Malbec
Carmenere
Merlot
Petite Verdot
Syrah
To Arrive 5/5/17….
Juices:
ALL Chilean Varieties
Grapes:
Cabernet Sauvignon
Cabernet Franc
Carmenere
Pinot Noir
Petite Verdot
Malbec
Merlot
Syrah
Please feel free to contact us at sales@juicegrape.com or 877.812.1137 to schedule your pick up!
We are looking forward to working with you this Spring Harvest! Keep an eye on our Facebook Page and Harvest Tracker for more harvest information and upcoming wine classes.
The Winemaker’s Think Tank: Vol 15 – How to work with Frozen Must

![]()
What’s the Winemaker’s Think Tank?
Every Thursday we will post about a few frequently asked questions that our winemaker has answered. If you have a winemaking question you would like to have answered, please email us at support@juicegrape.com and we will try to get into next week’s post. Cheers! 🙂
Simplifying Your Life with Frozen Musts
Life gets hectic. We totally understand. As the Fall and Spring wine grape harvest seasons approach, not everyone can just suddenly stop their normal life and shift into winemaking mode. Kids, vacations, work, weather and a myriad of other obligations can impact the ability of a winemaker to start a particular year’s vintage. And let’s not forget about those grapes – unfortunately they don’t seem to care much about your schedule. They ripen and arrive when it’s convenient for them, not for us. Fortunately there is a way to work with grape varietals anytime you choose by using frozen must.
Frozen must is exactly what it sounds like – fresh grapes that have been crushed and destemmed on site into must and then immediately frozen. Working with frozen must is very similar to working with fresh grapes, but there are some differences that winemakers should be aware of. With frozen must there is no need to take your crusher/destemmer out of storage and lift those heavy boxes of grapes into the machine. This part of the process is done for you already. If you were working with fresh grapes, the resulting must would be adjusted and then the winemaker would start the fermentation process. Yet by freezing this must we are basically halting the winemaking process by putting this must into a deep freeze – then the winemaker can thaw the must and continue the process when it is convenient for them.
Besides the convenience of making wine around your schedule ( with less equipment and less preparation/cleanup), there is another helpful benefit when working with frozen red varietals – cold maceration! During the freezing and thawing process the prolonged skin contact at cooler temperatures can maximize color extraction. Additionally, the tannins extracted during this time are water soluble and will be softer than the harsher, alcohol soluble tannins imparted during primary/post fermentation maceration. Now that we have touched on the benefits of using frozen musts, let’s transition to working with it.
When you receive the pails/drums of frozen must, we need to get the must thawed and up to fermentation temperatures safely. All of our musts are sulfited to 50ppm – this will help to control any oxidation that may take place during the thawing process and also help to limit the formation of bacteria in the grapes. However it is still possible for some freezer-burned or moldy grapes to be present – remove any grapes that look questionable. Some winemakers like to slowly bring the must up to temperature over the course of several days, while some recommend getting to pitching temps as quickly as possible. A slow temperature rise will prolong cold maceration and its benefits, but remember that the must is susceptible to unwanted bacteria and other bugs until primary fermentation starts. We recommend keeping the pails at room temperature – they should thaw out in 2-3 days.
It is important to stir the must as it is thawing. During the freezing process it is common for the natural sugars and potassium bitartrates to settle at the bottom of the pail (very much like the frozen Italian ice cups you can buy in the supermarket. The best part is the bottom of the cup where all the sugary, sweet goodness has settled to). Stirring the must with a clean and sanitized utensil daily will help homogenize it so that it thaws evenly. Once the must is at pitching temperature, empty the pails into your primary fermenter and treat it just like you would freshly crushed-destemmed grapes. Remember to get all the juicy bits and tartaric crystals from the bottom of the pail! We recommend taking pH, TA, brix, and S02 readings and adjusting accordingly. These readings can vary based on the temperature of the must and how well it has homogenized during the thawing process, so it is best to wait until the grapes are at room temperature. While we will always recommend using commercial yeasts to help with a steady, clean fermentation, it is very important to use these types of yeasts when working with frozen musts.
So there you have it – using frozen must can simplify a winemaker’s life by making it easier and less hectic. Isn’t that what we all hope for during the harvest season?
(A big thanks goes out to Robert Herold for his original article Winemaking From Frozen Must which appeared in the December 2012 issue of Winemaker Magazine)
We hope this information helps with your winemaking. If you have any follow up questions or winemaking questions in general, please email us at support@juicegrape.com.
Notes from our Winemaker Frank Renaldi about the Chilean Sauvignon Blanc: Primary Fermentation

Notes from our Winemaker Frank Renaldi about the Chilean Sauvignon Blanc:
Primary Fermentation
“Wine fermenting for 7 days slow and steady. Down to 4 brix. Nice nose and color as we wind down. Wine did get near 65F. I wet a bed sheet twice a day with cold water and wrapped around stainless tank. This helped keep the temp at 60F – nice and cool for a white wine. Too hot and you will blow off the nose.”
Don’t forget to sign up for the Spring Bootcamp with winemaker Frank Renadli! Learn how to make great wine at home in just 5 weeks!
Notes from our Winemaker Frank Renaldi about the Chilean Sauvignon Blanc: After the Press

Notes from our Winemaker Frank Renaldi about the Chilean Sauvignon Blanc:
After the Press
“Adjusted Brix to 21.5 (11.8% alcohol). Adjusted with Tartaric Acid to get pH = 3.24 and TA = .60. Will have to acidify after fermentation. Could have adjusted further, but ta would still be low (desired .7 – .9). Used Vin13 yeast – Very slow start. Took over 24 hours to get started. Still at 58 degree with a slow cool fermentation. No big nose yet. Looking forward to reporting more on the results once fermentation has completed.”
Don’t forget to sign up for the Spring Bootcamp with winemaker Frank Renadli! Learn how to make great wine at home in just 5 weeks!
The Winemaker’s Think Tank: Vol 12- Common Winemaking Faults and Flaws
![]()
What’s the Winemaker’s Think Tank?
Every Thursday we will post about a few frequently asked questions that our winemaker has answered. If you have a winemaking question you would like to have answered, please email us at support@juicegrape.com and we will try to get into next week’s post. Cheers! 🙂
In this week’s Winemaker’s Think Tank we outline the difference between flaws, faults, and how to identify them.
- Flaws
- Flaws are a mistake made in the winemaking process that leads to a property in the wine that is not characteristic of the varietal
- Stylistic Choice vs. Flaw
- Imbalance Flaw
- Acid vs Sugar, Oak Levels, Alcohol Level
- Visual Flaws
- Haze, Sediment, Effervescence, TA Crystals, Floaters, Lack of Color Saturation
- Aroma/Bouquet Flaws
- Lack of Aroma, Non-varietal aroma, Over-oaking
- Faults
- Faults are often a microbial or chemical reaction within the wine in some part of its life that significantly alters a wine, eventually leading to the point of spoilage.
- Oxidation Faults
- Acetaldehyde – oxidation of Ethyl Alcohol smells like sherry, or old apples, browning
- Causes: headspace, low sulfites, poor corks, bacterial contamination
- Acetic Acid – Vinegar
- Causes: Acetaldehyde, Acetobacter bacteria react with ethanol, Fruit Flie
- Ethyl Acetate – Nail Polish Smell
- Oxidation of Acetaldehyde and Acetic Acid
- Causes: headspace and bacterial contamination
- Acetaldehyde – oxidation of Ethyl Alcohol smells like sherry, or old apples, browning
- Sulfur Faults
- Hydrogen Sulfide – Rotten Eggs Smell
Causes: lack of yeast nutrients, yeast stress, sulfur sprays, yeast bi-product, high temps - Sulfur Dioxide – Burnt Match Smell
Causes: over sulfating, wild yeast - Complex Sulfur Faults- Mercaptans, DMS, DES, DMDS, DEDS
Causes: Hydrogen Sulfide reacting with Ethyl Alcohol
- Hydrogen Sulfide – Rotten Eggs Smell
- Microbial Faults
- Brettanomyces – Barnyard, Horse Saddle, Antiseptic Ointment, Band-Aids, Bacon, Clove
- Causes: spoilage yeast cells that are incredibly dangerous and difficult to eliminate. Most often found in contaminated barrels, winery cleanliness, resistant to acid and SO2
- Geranium Taint – Fresh cut geranium leaves
- Causes: Reaction of potassium sorbate with Lactic Acid Bacteria in the presence of Ethyl Alcohol
- Refermentation – Fizzy wine, popped corks
- Causes: Yeast or microbial fermentation of residual sugar
- Brettanomyces – Barnyard, Horse Saddle, Antiseptic Ointment, Band-Aids, Bacon, Clove
- Other Faults
- Cork Taint – Wet basement, wet old newspaper, mildew
- Causes: strain of trichloanisole on cork (cork taint); mold that contacts chlorine and wood
- Heat Damage – Cooked fruit smell, brick red color, similar to oxidation
- Causes: leaving wine in a hot car, in the sun, etc.
- Cork Taint – Wet basement, wet old newspaper, mildew
We hope this information helps with your winemaking. If you have any follow up questions or winemaking questions in general, please email us at support@juicegrape.com.
Recent Comments