


Where to start when Adjusting and Balancing Must

There are two main steps to Adjusting and Balancing Must, which consist of adjusting your Brix and adjusting your pH/TA. We’ll cover what they are, what they mean, and how to do both.
Where to start when Adjusting and Balancing Must
Firstly, you’ll need your starting numbers. You’ll have to measure your Brix, pH, and TA. To measure your Brix, you can use a Triple Scale Hydrometer. To measure your pH and TA, you’ll need a titration setup or an acid test kit, and some mathematical skills. If I lost you at math skills, don’t fret – Musto Wine Grape Company offers a wide variety of testing including pH and TA testing!
What are Brix, pH, and TA?
Brix is a measurement of the sugar content within your must. This indicates the degree of the grapes’ ripeness at harvest. The higher the Brix, the higher the alcohol content in the finished wine. To get an alcohol conversion level, simply multiply your Brix by .55. pH is the measurement of the ripeness in relation to acidity. A low pH wine is crisp and tart, while higher pH wines are more prone to bacteria growth and spoilage (3.9 pH and higher). Wine generally falls between 3 or 4 on the pH scale, with 3 – 3.4 being the average for white wines and about 3.3 – 3.6 for reds. Finally, TA is measuring acidity by volume. TA stands for Total Acidity. Usually, the higher the pH the lower the TA and vise-versa. This is not always the case though, and you may need to make adjustments to your must. Hold tight, how to do that is next!
How to Adjust and Balance Must
If you need to lower your TA, we recommend using Potassium Bicarbonate. Adding Potassium Bicarbonate to your must will reduce acidity. Make sure to add slowly, as it foams significantly. It is also recommended to add to water first, then add the mixture to your must. Under typical conditions and normal use, Potassium Bicarbonate neutralizes Tartaric Acid. It’s best used when the TA is high and pH is low, due to the fact it causes an increase in pH. It also adds potassium to the must and that requires cold stabilization. Potassium Bicarbonate can contribute to tartrate instability in wine, which is also why cold stabilization is recommended. It is also good to note that the addition of Potassium Bicarbonate will cause a reaction in the wine which will vary from wine to wine and the pH will not shift in a predictable manner. Bench trials should always be done first when attempting to adjust pH.
To lower pH, the most effective method is to add Tartaric Acid. If both TA and pH are too high, tackle the pH. The pH is more critical to the wine chemistry. This addition also requires bench testing to find the best addition.
To raise the brix, we can add table sugar to the must, be sure to dilute the sugar first with hot spring water before adding it to the must or juice. There are good formulas available to calculate sugar required based on the brix you are trying to achieve.
To lower the brix, we will add spring water to the must to “dilute” the high sugar content in the must or juice. Just beware there is a limit on how much water you can add to a must or juice before you reduce the wine quality. There are also good formulas for this adjustment too.
For exact measurements and instructions, follow the directions on the manufacturer’s packaging, contact a winemaker at Musto Wine Grape Company for assistance, or download our Full Class offering at WinemakingInstructions.com.
We’re here to help when you need it
As stated above, Musto Wine Grape offers a variety of products as well as services including testing and support. Email winemaker@juicegrape.com or call (877) 812 – 1137 to speak with someone who can assist you.
Wine Spotlight: Lanza-Musto Vineyards Malbec

Lanza-Musto Suisun Valley Malbec is a wine that brings velvety sweetness and dark complexity to the table.
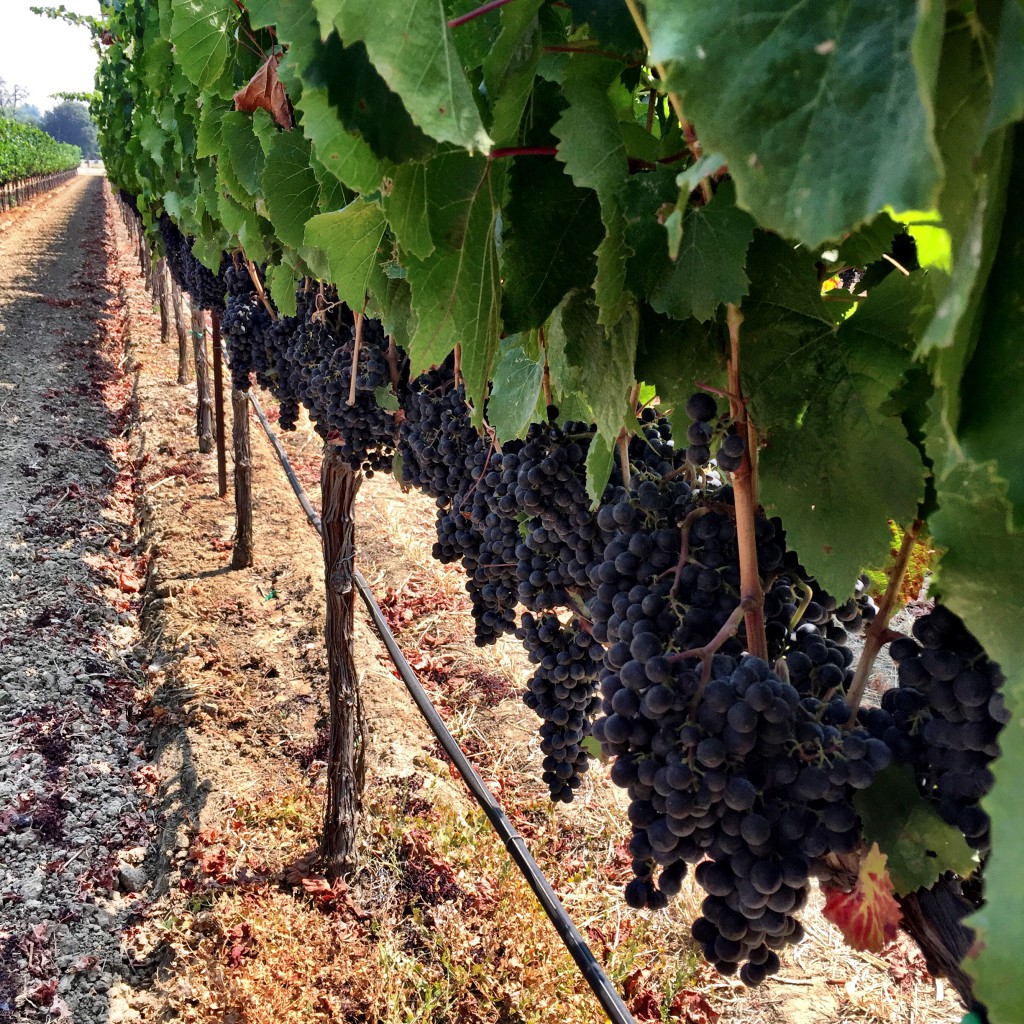
Suisun Valley, located in Solano County, California, is not traditionally known for Malbec wine production like some other regions, but it does have a small and growing reputation for producing high quality Malbec wines. If you’re considering buying Suisun Valley Malbec grapes, here are some reasons to consider:
Unique Terroir:
Suisun Valley’s terroir, characterized by its climate, soil, and topography, offers a unique and distinct environment for grape cultivation. While it may not have the recognition of regions like Argentina (known for Malbec), this uniqueness can result in wines with a different expression of the Malbec grape.
Varietal Exploration:
If you enjoy exploring different expressions of a grape variety, trying Malbec from a less common region like Suisun Valley can be an exciting adventure. It can offer a different flavor profile compared to Malbecs from more traditional regions.
Food Pairing:
Malbec is a versatile wine known for its medium to full body and rich, dark fruit flavors. Suisun Valley Malbecs can pair well with a variety of foods, including grilled meats, hearty pasta dishes, and cheeses.
Exploration:
If you’re an adventurous winemaker who enjoys exploring and discovering hidden gems, Suisun Valley Malbec can be an interesting addition to your wine collection.
Flavor Profile:
Medium bodied, mellow, fruity – raisins, fresh picked blueberries, plum, with soft, fine grained tannins, deliciously drinkable mocha notes.
Previous Season Grape Chemistry:
- Brix: 24.5
- pH: 3.29
- TA: .65gms/100ml
- Clone 9
- Planted in 2009
- Soil: Yolo, Silty Clay Loam
- VSP posititioning
To make an order please contact us via sales@juicegrape.com or call us at 877-812-1137, follow us on Facebook, Instagram, and Youtube, or check out the Harvest Tracker and Winemaker Blog on our website- juicegrape.com.
Wine Barrel Care and Maintenance

Winemaking is an investment in most winemakers’ eyes. One of your most tedious but worthwhile investments will be a wine barrel. They are expensive to produce and challenging to maintain, but the impact it can have on the quality of your wine makes it worthwhile. This article will cover the anatomy of the barrel, how to clean it, and the maintenance you should familiarize yourself with if you plan on owning one.
Inspecting your barrel
The first thing you should do as soon as you receive your new (or used) wine barrel is to inspect it. You should start by visually examining the barrel’s exterior. Keep an eye out for broken chimes, dented or displaced heads, and misaligned staves. Also look for scrapes, gouges, and any torn or burred hoops. Next, you’ll need to inspect the inside of the barrel. The inside should be completely dry and free of mold. The area where the head meets the staves can be a breeding ground for mold, which usually occurs from a combination of standing water and exposure to starch used in the construction of the barrel. Lastly, observe the aroma of the barrel. The barrel should smell clean, fresh, oaky, and/or toasty. Other than sulfur, there should be no chemical odors and certainly no aroma of spoilage.
Prepping your barrel for wine
This will include one last inspection of your barrel, which is testing your barrel for leakage first. You need to rehydrate your barrel, or “swell” it to prepare it for wine, but it’ll kill two birds with one stone allowing you to inspect for any possible leaks. There are two ways to swell your barrel, the first option being the hot water/quick soak method. The second option is a coldwater/high volume soak. The only main difference is the speed of which the soaking gets done.
Hot water/quick soaking consists of filling the barrel with 3-5 gallons of filtered, chlorine-free, hot water. The ideal temperature for this would be about 180 degrees Fahrenheit. Use caution when using water hotter than this, or using high-temperature steam as this can degrade and damage the barrel. Once you’ve filled your barrel, place your stopper in the bunghole. Rotate the barrel from side to side, completely wetting the barrel’s interior. Stand the barrel upright on its side (one head facing down, the other up) and let stand for about 4 hours to rehydrate the head. Repeat with the opposite side for an additional 4 hours. During these processes, make sure to continuously check for any leakage. If there are no leaks, turn the barrel so it’s bunghole is facing toward and allow to drain and dry completely.
Coldwater/high volume soaking calls for filling he barreling completely with filtered, chlorine-free, cold water. Once you’ve filled the barrel completely, place your stopper in the bunghole and let the barrel stand for about 24 and 48 hours. Once no leaks are present, empty the barrel and allow it to drain and dry completely.
If your barrel continues to leak after multiple swelling attempts
If after either of these methods are complete the barrels still exhibit leaks, repeat the swelling process as it’s possible it just needed more time to swell. There are some additional methods of swelling you can attempt that are more aggressive but can possibly help seal any leaks.
The submerging method:
We have found that sometimes soaking the interior and exterior of the barrel simultaneously can help to get it swelled. Start by placing the barrel upright on one head in a large container. Fermentation tubs work great for this. Next, fill the barrel halfway until water is seeping from the bunghole, then fill the container it’s in up to the same bunghole. Let the barrel sit overnight, then remove all water from the barrel and container, flip the barrel onto its other head and repeat the process. Once emptied, use the cold water method and check for any leaks.
The hoop tightening method:
The hoops on a barrel can become loose when it becomes dry. Using a hoop driver, or if no hoop driver is available, a cold chisel to hammer the hoops toward the center of the barrel. Workaround the barrel, hammering firmly at around one-quarter increments of the circumference. It may be necessary to remove the hoop nails to allow the hoop to slide tighter onto the barrel.
The Barrel Sealing Wax method:
Beeswax can be used to seal small leaks. The first step is to mark any leaks with a pencil or chalk. To properly apply sealing wax, first make sure the barrel is dry. Next, gently sand leaking areas with rough sandpaper. Knead a small piece of beeswax in your hand and work the wax into the area using a putty knife. Beeswax will not change the flavor of your wine and is completely safe to use.
After several attempts, if your barrel continues to leak, it is important to call your sales rep immediately. Empty the barrel, allow it to drain, and completely dry. Next, you have to treat each barrel with 10-20 grams of sulfur sticks (or the equivalent gas form) and re-insert the stopper. This will ensure that you are still maintaining the integrity of the interior of the barrel.
Storing your barrels
Ideally, barrels should always have wine in them. If you are in between winemaking projects though, or you’re waiting for harvest, there are a few guidelines you should follow when storing your barrels. If you are storing a new barrel, store in a cool, humid environment. Some new barrels arrive with their plastic film still on them – if yours does, keep that film on if you plan to store them for a significant amount of time. The process of storing a used barrel requires a bit more work.
If you are ready to empty your barrel, empty it and wash the barrel out with hot water until all of the deposits and tartaric crystals have been dissolved and emptied. Repeat if necessary. If you have access to larger volumes of hot water, fill the barrel completely and let sit overnight. Once emptied, rinse the barrel with cold water and let it dry with the bunghole facing down. Allow to completely dry, and then burn sulfur sticks or discs in the barrel and place stopper in the bunghole. This burning treatment should be repeated every six weeks or so until you are ready to use the barrel again. Finally, store your barrels in a cool, humid environment.
Other tips and tricks for maintaining your barrel
Never leave water in a barrel for more than two days. If the swelling process takes longer, empty, and refill the barrel with fresh water to avoid mold and spoilage micro-organism growth.
A full barrel is a happy barrel! If possible, try to refill your barrel immediately after it has been emptied and cleaned. This way you will never have to re-swell it and there is much less opportunity for bacteria and other spoilage organisms to get into the barrel.
Never use chlorine in or around a barrel, or any winemaking equipment for that matter. TCA, also known as cork taint, can infect much more than just corks. A barrel is a vulnerable place for TCA to be absorbed into due to the spores, molds, and natural phenolics of the wood.
When in doubt, throw it out – or repurpose your barrel for something other than winemaking. If you suspect that there are spoilage organisms in your barrel even after you have tried ozone/steam/proxycarb, (you can find info on these here) err on the side of caution and retire it. You can ruin any future wine you put into such a barrel and it can possibly infect the rest of your winemaking equipment if they are stored near them. Barrels can be repurposed into planters, furniture, and more!
Where can I purchase wine barrels?
Musto Wine Grape Company carries a few categories of wine barrels including new and used American and French wine barrels! Email sales@juicegrape.com or call (877) 812 – 1137 to speak with one of our Musto Crush Crew members to get your order placed, or if you need any assistance in using, maintaining, or storing your barrel. We also offer ozoning treatments if you are dealing with a problem barrel. We are here to provide everything you need to make the wine of your dreams, including the customer support to ensure your success!
A Guide to Malolactic Fermentation

Malolactic Fermentation, also known as Secondary Fermentation or “Malo”, is the process in which Malic Acid in the wine converts to Lactic Acid.
What is Malolactic Fermentation?
As stated above, it is the process in which Malic Acid in the wine converts to Lactic Acid. The primary role of Malolactic Fermentation is to deacidify the wine which affects the sensory aspects of wine, making the mouthfeel smoother and it adds complexity to the flavor and aroma of the wine. The deacidification of the wine happens by converting the harsh diprotic malic acid into the softer monoprotic lactic acid. Nearly all red wines go through Malo while only a few whites, like Chardonnay and Viognier, do. One way to recognize if a wine has gone through Malo is if it has a creamy, buttery mid-palate texture. The buttery flavor comes from diacetyl, a by-product of the reaction.
What is Diacetyl?
Diacetyl is a flavor metabolite produced by lactic acid bacteria known as Oenococcus Oeni. Oenococcus Oeni is the main bacteria responsible for conducting Malo, due to its ability to survive the harsh conditions of wine. It is responsible for the production of the sensory aspects noted above. Malo can happen naturally, though often inoculated with the bacteria culture to jumpstart the process.
When does Malo take place?
Malolactic Fermentation can happen in two different ways, during primary fermentation or after. Amid fermentation, it is Co-Inoculation. After fermentation, it is Post-Fermentation Inoculation. Inoculation that takes place after alcoholic fermentation is the most common practice. When you add bacteria cultures like MBR31 after fermentation is complete, it jumpstarts the Malo process. Co-inoculation takes place at the start of alcoholic fermentation, which allows winemakers to focus on other things such as the improvement of flavor development.
What are the signs that Malo is in progress, and how do I know if it is finished?
The best way to identify malo in progress is bubbles! The malolactic activity can be detected by the presence of tiny carbon-dioxide bubbles. When the bubbles stop, Malolactic Fermentation is complete. This can take anywhere between one and three months.
What are the benefits of each method?
Firstly, the benefits of post-fermentation inoculation include better control of the start time duration of Malo. Lessened biogenic amine production leaves the wine unprotected by sulfite for a limited amount of time. This allows less potential for spoilage by other organisms. It reduces the incidence of excessive volatile acidity and enhances flavor profiles and complexity. The benefits of co-inoculation include lower levels of the inhibitory alcohol that are present at the start of Malo, and no need to apply external heating to the ferment due to the heat generated by the yeast fermentation. This results in faster completion of Malo. This means the wine can have sulfite added earlier and reduces the potential for the growth of spoilage organisms. Finally, a bonus is that bacteria added at the start of the yeast fermentation encounter a nutrient-rich environment.
Need assistance with your winemaking process?
Musto Wine Grape Company is here to help. We offer a wide variety of products and services to help you at any stage in your winemaking journey. Email winemaker@juicegrape.com or call us at (877) 812-1137 to speak with someone who can assist you.
Pocket Guide: The 9 Styles of Wine

The world of wine is a big one. Whether you are a newbie winemaker or drinker, or one of the pro’s that just needs a refresher.
We put together a printable pocket guide for identifying the 9 styles of wine.
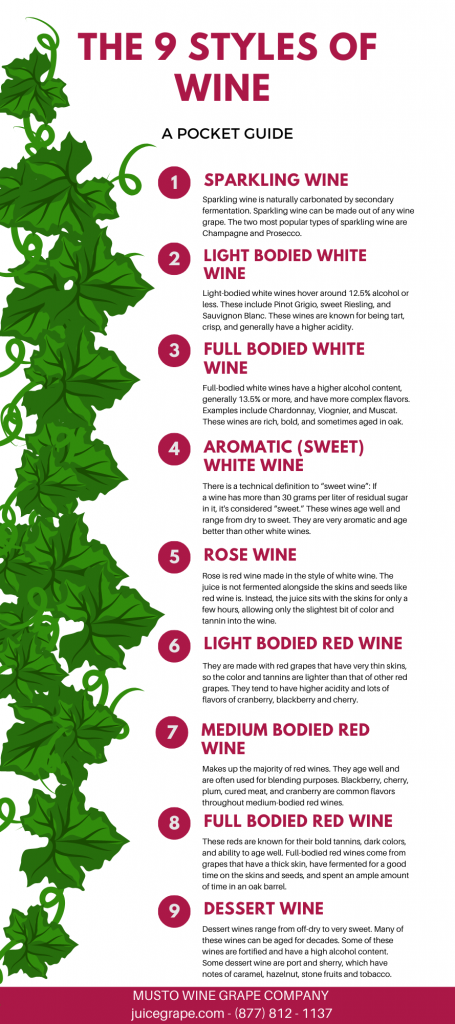
This printable pocket guide provides a simple overview of each of the 9 styles of wine and what characteristics to look for. Its a great idea to keep handy in your wine tasting notebook so as you write your tasting notes you can easily identify each wine!
Once you are able to taste the 9 styles of wine, it will give you a better understanding of wine as a whole. Once you have a good understanding for wine, you’ll be able to fully understand tasting wine and even making it! Obviously wine tasting and winemaking can be complex but with dedication for learning, and having the support (us!) it can ensure your success.
Other types of reference guides that are good to keep handy are things like a wine tasting wheel and color chart that allows you to identify more colors, aromas and flavors!
Want to make your own wine? Musto Wine Grape Company is here to help. Give us a call at (877) 812-1137 to speak with one of our Crush Crew members to get you on track to making the wine of your dreams!
A Guide to Cabernet Sauvignon

What is Cabernet Sauvignon?
Known as the king of red grapes, Cabernet Sauvignon enjoys the same regal status in California as it does in its native home of Bordeaux, France. Californian Cabernet Sauvignon tends to be more fruit-forward and mellow, with rich dark fruit notes. The most common aromatic and flavor components found in this varietal are plum, black cherry, blueberry as well as warm spice, vanilla, black pepper, and tobacco. Aside from being known for its dark color and full body, it’s known for often being over 13.5% in alcohol content. The average alcohol content of a Cab from California floats around 14.5%. At Musto Wine Grape we carry a variety of Cabernet Sauvignon grapes from multiple AVAs in California, as well as all of the yeasts, nutrients, and equipment you’ll need.
What kind of yeast should I use when making Cabernet Sauvignon?
*Note that full expression of the desired characteristics for any of the following yeast strains is based on proper care and feeding if the yeasts, along with using quality fruit and good winemaking practices. It is also strongly recommended that Go-Ferm and Fermaid-K are used as well as temperature management throughout the entire fermentation. As always, if you need assistance with any part of your winemaking process, do not hesitate to reach out to us at sales@juicegrape.com or give us a call at (877) 812-1137 to speak with someone who can assist with any product recommendations, procedures, or problems.
BM45 yields a big mouthfeel, notes of cherry liquor, rose petal, jam, plum, berry as well as earthy and spicy elements. It offers color stability and helps to minimize vegetative characteristics.
BDX is an all-around great choice for berry, plum, and jam characteristics. It has a moderate fermenting rate and offers good color retention. By re-enforcing existing tannins, it develops structure in the wine. Because of this, we advise to not use with unripe fruit.
RP15 emphasizes the berry aspects of the fruit, along with color stability, increased mouthfeel, and agreeable tannins.
D254 yields a big mouthfeel and rounds tannins as well as intense fruit. It has a focus on berry and jam characteristics, but more so of dried fruit than fresh. It’s also great for color stability and adds body to blends.
D80 offers big volume and fine grain tannins. It is great for encouraging more positive tannin intensity to a blend.
Where do you source your Cabernet Sauvignon from?
We offer Cabernet Sauvignon from multiple AVA’s within California and Washington:
Lanza-Musto Vineyards in Suisun Valley, CA (Valley, 169, 15, and Koch)
Mettler Family Ranch in Lodi, CA
Napa Valley, CA
Washington State (Clone 33)
Sonoma County, CA (Chalk Hill)
Amador, CA
King’s River, CA
Paso Robles, CA
Central Valley, CA
Is there a certain winemaking procedure specific to Cabernet Sauvignon?
You can follow our Red Wine Grape Procedure which you can find here, if you are using juice you can find the procedure here and if you are using frozen must, here. The procedure is standard for making red wines, but using the proper yeasts and nutrients specific for Cabernet Sauvignon and consistent monitoring will have the biggest impact on your final wine.
Where can I buy grapes, juice, or must?
At Musto Wine Grape Company, all red grape varieties are available in 36lb cases, in frozen must by request, or in 6-gallon fresh juice pails. For Sterile Juice options that can be shipped year-round and without refrigeration click here.
Finally, if you need the best options and equipment suited for you and your winemaking goals, email sales@juicegrape.com or call (877) 812 – 1137 to speak with one of our Musto Crush Crew members who can help. We are here to provide all of the winemaking products you need to make the wine of your dreams, as well as the customer support to ensure your success!
Peach Prosecco Popsicles

Peach Prosecco Popsicles
One of our all-time favorite summer treats is popsicles. You can make popsicles from pretty much anything, and they are perfect to cool down on a hot summer night! Not to mention, throwing in some fresh fruit and wine into a popsicle is one of the most genius inventions. We’ve got an easy peach prosecco popsicle recipe waiting for you, so keep reading!
Peach bellinis are a favorite cocktail! If you like them as well, you’re in luck because these popsicles are basically peach bellinis on a stick.
What you need and what to do:
You’ll need to buy some peach puree or make some yourself, which isn’t difficult at all. To make your own, grab 3 ripe peaches. Bring a pot of water to a boil, and place the peaches inside for about 1 minute. After about a minute, immediately remove the peaches from the boiling water and place into a bowl of ice water. Let the peaches sit in the cold water for about a minute or so, and you’ll be able to peel the skins off with your fingers. You can also use a knife if that’s your thing. Once you have removed the skins, you can begin to slice the peaches and remove the flesh off of the pits. Next, you’ll place the peach slices into a food processer or blender and blend until smooth. An easy alternative would also be to buy a bag of frozen sliced peaches if you want to skip the boiling and peeling. If your peaches are not sweet to your standards, feel free to add some sweetener to give it a boost. Mix your puree with Prosecco and pour it into popsicle molds. You can freeze overnight, or if you prep in the morning they can be ready for the late-afternoon.
Enjoy with family, friends, or a good quarantine movie night.
Want to make your own wine?
Musto Wine Grape Company is here to provide everything you need to make the wine of your dreams, and the support along the way to ensure your success! Give us a call at (877) 812 – 1137 to speak with a member of Musto’s crush crew to get you started!
Brasato al Barbera (Beef Braised in Barbera) Recipe
 Recipe")
Brasato al Barbera (Beef Braised in Barbera)
A Piedmont style braised beef recipe cooked in red wine.
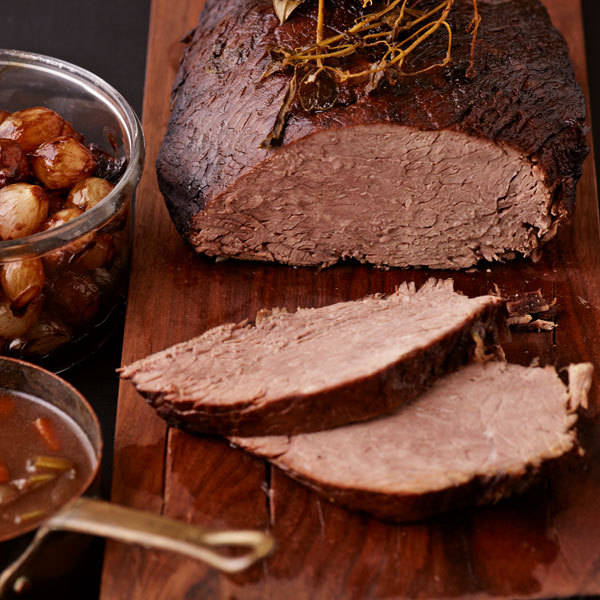
Known as “the people’s wine”, Barbera is an everyday drinking wine from the Piedmont region.
Barbera is a palate pleaser because it is easy to drink, well balanced and affordable.
Our 2017 Barbera has flavors of cherries, strawberries and raspberries, and intense aromas of blackberries. This Barbera is very low in mouth-drying tannins and high in acidity, which makes it the perfect wine to pair with rich foods like cheeses, meats and earthy mushrooms.
What you’ll need:
- 1 Tbsp olive oil
- 1 (3-pound) boneless beef chuck roast, patted dry
- Salt and freshly ground black pepper
- 3 ounces pancetta, diced
- 1 yellow onion, diced
- 4 medium carrots, diced
- 4 celery stalks, diced
- 5 cloves garlic, minced
- 1 1/2 bottles (4 1/2 cups) Barbera
- 2 cups chicken stock
- 2 sprigs rosemary
- 2 bay leaves
- 1 cinnamon stick
- 2 Tbsp cornstarch
- 1/4 cup chopped fresh parsley, for garnish
What to do:
- Heat the oven to 325 degrees.
- In a large Dutch oven, heat the oil over medium-high heat. Sprinkle the beef with salt and pepper.
- Add the beef to the pot and cook, turning every 2-3 minutes, to brown on all sides.
- Once browned, remove the beef from the pan, add the pancetta to the fat in the pan and cook until browned, about 3 minutes.
- Add the onions, carrots, celery and a pinch of salt; cook until caramelized, about 15 minutes.
- Add the garlic and cook until fragrant, about 30 seconds. Return the beef to the pan and add the wine, 2 cups of the stock, rosemary, bay leaves and cinnamon stick.
- Bring the liquid to a simmer over medium-high heat, then cover tightly and transfer the pot to oven.
- As it’s cooking, turn the roast every 30 minutes until fully tender and a meat is starting to fall apart when poked with a fork (3 1/2-4 hours). Remove the meat from the pan and tent with foil to keep warm.
- Remove the rosemary, bay leaves, and cinnamon stick, and place the pot over high heat. Cook about 10 minutes.
- Ladle about 1/2 cup of the hot sauce into a small bowl, whisk the cornstarch into the hot sauce then add slurry back into the sauce in the pan and cook another 10 minutes until the sauce has thickened a bit.
- Adjust the seasoning to taste and turn the heat off. Place meat onto a platter. If it has not completely fallen apart, thinly slice the beef across the grain into 1/4-inch thick slices. Serve the beef ladled with the sauce. Garnish with parsley and serve.
Want to make your own Barbera? Musto Wine Grape Company is New England’s largest supplier for winemaking products and services. From home winemakers to wineries, we’ve got you covered! Give us a call at 877 – 812 – 1137 to speak with someone to get you started.
A White Wine Drinker’s First Shot at Tasting Red Wines

A White Wine Drinker’s First Shot at Tasting Red Wines
Christina has given me a few bottles of wine to stretch my tasting abilities and educate my nose and taste buds. Here’s how it went! My go-to’s have always been a sweet white or rosé, I haven’t really ventured out with reds mostly because the first red I had was gross and I figured all red wines were like that. I was definitely wrong! Note, I am a beginner at tasting red wines so these are very amateur notes.
The first wine Christina gave me to try was a 2018 Sonoma Cabernet Sauvignon.
Ashley: I smell cherry the most, with kind of a plumy smell, and maybe prune; but cherry was the first thing I smelled.
Christina: Great! Next time think about what kind of cherry – Black cherry? Red cherry? Ripe cherry?
Ashley: It has a nice deep purple toned color to it and has no floaters.
Christina: Good, the browner the tinge of the wine the older the wine is.
Ashley: There’s no carbonation or fizz – I’m used to the wines I drink having bubbles or a little fizz to them.
Christina: Good! Fizz really only happens if the wine wasn’t taken care of or if it is a sparkling wine.
Ashley: It makes my mouth pucker at first but doesn’t leave my tongue dry for long, it goes away quickly.
Christina: If you salivate that means the wine is high in acid, if it dries out your mouth that means tannins are present. Sometimes people use the word “pucker” referring to both. Next time try to think about what is causing that feeling? Is it the salivation in your mouth like if you just tasted a bitter lemon, or is it the drying out of your mouth/chalky feeling in your mouth?
Ashley: Alcohol is pretty high!
Christina: Glad you picked up on this! Most Cabernets from Sonoma and Napa California are higher in alcohol.
Ashley: Kind of tastes like a Cigar.
Christina: That usually has to do with barrel aging or growing region; you find this characteristic a lot in red wines from Chile and Argentina. If you find it in a CA wine it’s usually due to barrel aging in a heavy toasted barrel.
Ashley: I pick up black pepper but it’s not strong.
Christina: I’m glad you thought about the type of pepper. That’s great. Try to be as specific as you can be.
Ashley: It’s easy to swallow but gives a hot feeling in my chest, kind of like if you drank something hot with cinnamon.
Christina: That is an indicator of high alcohol. Good job picking up on that!
Ashley: Kind of a charred taste, like eating the black burnt part of a marshmallow or pizza crust.
Christina: This has to do with the aging process of this wine. It sounds to me like it was a little “tight” and could have been laid down for a few more years so the balance of fruit and earth could shine through. Great specific description of what you tasted.
Ashley: It’s not something I would drink on a regular but it wasn’t terrible.
Christina: Great, you are figuring out what you like. Think about what type of food you would have this with and if it would change your perception of the wine.
Next was a 2015 Cabernet Sauvignon 169.
Ashley: This one gave a rush of burning through my nose upon first sip and swallo2. It reminds me of the sensation you get when you burp through your nose
Christina: This means it’s got a decent amount of alcohol in it.
Ashley: I definitely taste black pepper with this one; it’s very smooth, smoky and earthy. Kind of when you eat a vegetable right out of the garden without washing it and it has like dirt on it haha!
Christina: Haha those are good descriptors!
Ashley: It doesn’t seem to be too high in tannins, after a few sips my tongue started to dry out, but right off the bat I didn’t feel much dryness.
Christina: This means the tannins were balanced, soft, and supple. That’s a good thing for red wines.
Ashley: I also got black cherry and plum in this one, though it is dry it kind of gave me the impression that it was going to be slightly sweet, because it smells like it but it definitely was not sweet.
Christina: This happens a lot with dry red wines; you get sweet notes on the nose but not on the palate. Good job picking up on the fruit aromas!
Ashley: Overall this is the first red wine I didn’t hate and would actually drink again! I definitely see myself enjoying it with a steak for dinner.
Christina: Wow that’s great!
The last wine I tried was a 2018 Chilean Malbec.
Ashley: Very earthy, I got that same dirt taste from the cab but it’s way more prominent with this one.
Christina: Good descriptors!
Ashley: It’s also very dry, significantly drier and higher in tannins than the cab 169. It dried my tongue out on the first sip and kind of made my throat feel dry too.
Christina: Perfect! Now you know the difference between medium/balanced tannins and high tannin wines.
Ashley: I do pick up on a black pepper, and get some licorice, some bitter blackberry as well. But the dirt taste is what my mouth captures first and sticks throughout the whole experience.
Christina: Okay good observations and descriptors!
Ashley: I wasn’t a fan of this one because the dirt taste was all I could focus on.
Christina: Good! You know now that you don’t like high tannin earthy wines.
Reflection
The Cab 169 from Suisun Valley, CA definitely left an impression on me and I am going to explore with other wines from the similar region and see what else I can take a liking to! Overall this was a fun experience and I look forward to experimenting and broadening my wine horizons. A big thanks to Christina for being an awesome teacher, it’s looking like I’ll be a pro at tasting and winemaking in no time!
If you are interested in wine tasting and help with developing your palate, do not hesitate to reach out to us at Sales@JuiceGrape.com, or by calling us at 877-812-1137. At Musto Wine Grape we are always searching for ways connect with you and help you along in your winemaking and wine loving journey. We offer a wide variety of products, services and classes to help you create a wine you love and assist you in being able to experience the way wine was created to be experienced!
For updates on harvests, educational tutorials and more, follow us on Instagram and Facebook.
Milk Loaf Recipe Using 71B Yeast

Have you run out of ideas for what to keep yourself busy with during quarantine? We’ve decided to experiment and the results were delicious. Using 71B yeast and Scott Lab’s recipe for milk loaf, we put our baking skills to the test and had a whole bunch of fun doing it!
Prep time runs just about two and a half hours, and bake time is about 25 minutes so this will surely keep you busy!
Here’s what you’ll need (for a yield of 2 loaves. If you’d like more increase ingredients as needed):
- 4 cups of bread flour
- 2 teaspoons of salt
- 1 tablespoon of sugar
- 2 sachets (9 grams) of Lalvin 71B Yeast (Don’t have this on hand? No worries! We have it in stock. Give us a call/visit and we’ll get you what you need!)
- 2 tablespoons of butter
- 1 cup warm whole milk
- 1 cup tap water
Here’s what you’ve got to do:
- Mix all dry ingredients together in a bowl. Then, add butter, milk and water. Mix everything together with a spatula.
- Once the wet ingredients have been absorbed, remove dough from bowl and transfer to a counter or workspace.
- Extensively knead the dough by stretching and folding it repeatedly. Once the dough is smooth and slightly shiny, divide it into two pieces. Cover each with plastic and let rise for 40 minutes.
- Flatten each piece of dough and roll into the shape of a football. Let the dough rise again for another 40 minutes.
- Place the dough into a bread pan (about 6”-7” long, 3.5” deep) and cover with plastic and allow to rise for another 60 minutes.
- Bake in a pre-heated oven at 420 degrees F for approximately 25 minutes.
- Let cool and enjoy!
Show us your finished loaves on Instagram and Facebook by commenting or tagging us @mustowinegrapeco and using the hashtag #mustocrushcrew
Recent Comments