


Where to start when Adjusting and Balancing Must

There are two main steps to Adjusting and Balancing Must, which consist of adjusting your Brix and adjusting your pH/TA. We’ll cover what they are, what they mean, and how to do both.
Where to start when Adjusting and Balancing Must
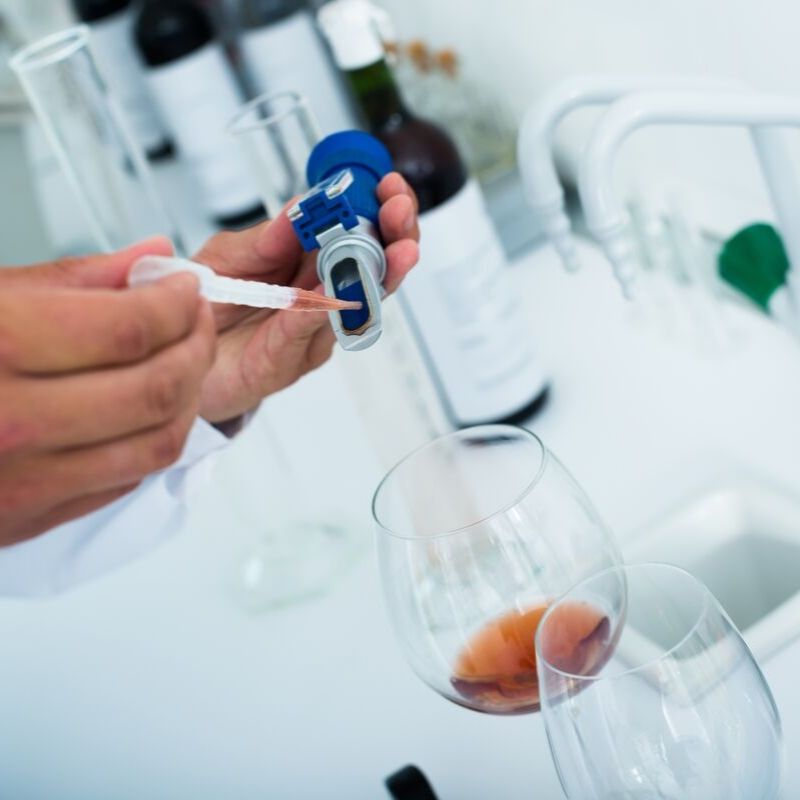
Firstly, you’ll need your starting numbers. You’ll have to measure your Brix, pH, and TA. To measure your Brix, you can use a Triple Scale Hydrometer. To measure your pH and TA, you’ll need a titration setup or an acid test kit, and some mathematical skills. If I lost you at math skills, don’t fret – Musto Wine Grape Company offers a wide variety of testing including pH and TA testing!
What are Brix, pH, and TA?
Brix is a measurement of the sugar content within your must. This indicates the degree of the grapes’ ripeness at harvest. The higher the Brix, the higher the alcohol content in the finished wine. To get an alcohol conversion level, simply multiply your Brix by .55. pH is the measurement of the ripeness in relation to acidity. A low pH wine is crisp and tart, while higher pH wines are more prone to bacteria growth and spoilage (3.9 pH and higher). Wine generally falls between 3 or 4 on the pH scale, with 3 – 3.4 being the average for white wines and about 3.3 – 3.6 for reds. Finally, TA is measuring acidity by volume. TA stands for Total Acidity. Usually, the higher the pH the lower the TA and vise-versa. This is not always the case though, and you may need to make adjustments to your must. Hold tight, how to do that is next!
How to Adjust and Balance Must
If you need to lower your TA, we recommend using Potassium Bicarbonate. Adding Potassium Bicarbonate to your must will reduce acidity. Make sure to add slowly, as it foams significantly. It is also recommended to add to water first, then add the mixture to your must. Under typical conditions and normal use, Potassium Bicarbonate neutralizes Tartaric Acid. It’s best used when the TA is high and pH is low, due to the fact it causes an increase in pH. It also adds potassium to the must and that requires cold stabilization. Potassium Bicarbonate can contribute to tartrate instability in wine, which is also why cold stabilization is recommended. It is also good to note that the addition of Potassium Bicarbonate will cause a reaction in the wine which will vary from wine to wine and the pH will not shift in a predictable manner. Bench trials should always be done first when attempting to adjust pH.
To lower pH, the most effective method is to add Tartaric Acid. If both TA and pH are too high, tackle the pH. The pH is more critical to the wine chemistry. This addition also requires bench testing to find the best addition.
To raise the brix, we can add table sugar to the must, be sure to dilute the sugar first with hot spring water before adding it to the must or juice. There are good formulas available to calculate sugar required based on the brix you are trying to achieve.
To lower the brix, we will add spring water to the must to “dilute” the high sugar content in the must or juice. Just beware there is a limit on how much water you can add to a must or juice before you reduce the wine quality. There are also good formulas for this adjustment too.
For exact measurements and instructions, follow the directions on the manufacturer’s packaging, contact a winemaker at Musto Wine Grape Company for assistance, or download our Full Class offering at WinemakingInstructions.com.
We’re here to help when you need it
As stated above, Musto Wine Grape offers a variety of products as well as services including testing and support. Email winemaker@juicegrape.com or call (877) 812 – 1137 to speak with someone who can assist you.
Musto’s Wine Analysis Services

If you’ve ever found yourself wondering…
- How do I get accurate numbers on my wine samples?
- Can I trust the readings I’m getting?
- How do I even do this test?!
…fear not! Musto Wine Grape Company can happily assist you with all of your wine analysis needs.
What analyses do we offer?
- Brix, pH, TA
- Free and/or total SO2
- Alcohol
- MLF
- YAN
- Sensory analysis
Why is analysis important?
- Knowing the Brix, pH, and TA of your juice sample is the most important first step pre-fermentation. Depending on these numbers you may need to acidulate (add acid) or ameliorate (add water) to your must or juice before initiating fermentation.
- SO2 levels will indicate how well protected your wine is. You may need to add more or less depending upon the reading.
- Alcohol % (ABV) is an important number to confirm, especially if looking to confirm the final number for a wine label.
- The presence of malolactic bacteria will indicate whether or not MLF has completed in your wine.
- YAN numbers will tell you the amount of yeast assimilable nitrogen levels will help you decide how much nitrogen/nutrients you may want to add throughout the alcoholic fermentation.
- Sensory analysis entails our highly knowledgeable and skilled staff conducting a taste test on your samples. This is especially helpful if you are looking to see how to improve upon your current wine, or how to sharpen your winemaking skills for future vintages.
Interested in getting your wines analyzed at our lab?
Great! There’s one of two ways to get your samples to us:
- Drop by to say hello and give them to us directly. You can fill out a lab analysis form from our website to bring in with you.
- Send them in with the above lab analysis form. Be sure to include all of your contact information!
Any other questions? Give us a call at 860-278-7703. We’re always happy to help you make your wine the best it can be!
Winemaker Lab Skills Class – October 9th

Musto’s Winemaker Lab Skills Class will be held on Wednesday October 9th at 7:00PM.
Want clarification on TA, pH, and Adjusting Your Wine?
Then this is the class for you!
Professor Frank Renaldi will go over the following lab skills every winemaker needs. It can be difficult to feel comfortable testing your wine. However, Frank has some easy tricks and tips of how to test and adjust your wine.
Class Outline:
- Equipment & Supplies
- Volume Measurements
- Sugar, Content, & Adjustments
- Acidity, Content, & Adjustments
- pH
- Sulfites, Need, & Adjustments
- Blending
- MLF
- Sugar Addition
Sign up today and start sharpening your Winemaker Lab Skills!
Sign up via the website HERE or give us a call at 877-812-1137 to sign up over the phone. We look forward to seeing you in class. Cheers!
12 Steps to Making Wine from White Grapes

Making Wine from White Grapes
1. Sanitize and Crush and Destem – Inspect your grapes and remove any moldy clusters. Crush and destem into clean and sanitized food grade plastic tubs. Always rinse your receiving vessel with a sanitizing strength potassium metabisulfite solution (2oz/gallon or 3tbsp/gallon). Make sure that the sanitizing solution touches all the surfaces of the vessel and that the vessel is completely emptied out of all sanitizing solution after. Shake free any drops as best you can from the vessel. Having remaining sulfite liquid in the vessel will prohibit fermentation. Do not rinse the sanitizer off with water after sanitizing as that will reintroduce bacteria to the environment.
2. Once all of the grapes are crushed, try to accurately measure your quantity of must. Add ¼ tsp of potassium metabisulfite for every 5 gallons of must that you have. Mix up the must thoroughly.
3. Wait for 2 hours after the sulfite addition and then add pectic enzyme to the must. Musto Wine Grape offers generic pectic enzyme or Cinn Free pectic enzyme that is specifically designed for white wine grapes. Follow the directions for the individual type of enzyme. Always mix it with water to create a 10% solution (if you use 5mls of enzyme, mix it with 45mls of water). The water allows it to better circulate throughout the must. Allow the pectic enzyme to work for 6 hours before pressing.
4. Press the Must – Wash the press and sanitize using potassium metabisulfite. Again, make sure the press does not have an excessive puddles or lingering amounts of sanitizing solution remaining. Sanitize the receiving container for fermentation (carboy, tank, demijohn, barrel) and any pumps or tubing that you may use. Anything that comes in contact with the wine should be rinsed with sulfite sanitizing solution. Place a screen or mesh (also sanitized) inside of the press to hold back any extra skins or seeds from getting through. Start by scooping up the must and placing it in the press. Some of the liquid will immediately flow through; this is the “free run”. When the press is full, slowly begin pressing. Do not try and press every last drop out of the must as this can lead to seed cracking and bitterness in the wine. Fill each container to within 6 inches of the top, to allow room for fermentation. This process will cause the juice to foam up and generate gas, therefore volume.
5. After pressing the grapes, mix the container thoroughly and take and record your measurements. Measure Brix, pH, and TA. If you need to adjust your juice at all, this is the time to do it. Ideally your Brix should be between 21-26 degrees, the pH between 3.2-3.5, and the TA between 6.5-8.5g/L. Your initial Brix reading, multiplied by .55, will give you a close estimate of your ending alcohol by volume percentage.
6. If you would like to use fermentation tannins (FT Blanc) or fermentation nutrients such as Opti-White, add them after measurements and adjustments have been made. Musto Wine Grape packages FT Blanc and Opti-White in small packs for 5 gallon batches. Mix any of these ingredients in thoroughly.
7. After measurements have been taken and any adjustments have been made, it is time to set yeast if you are using a cultured yeast strain. Use 1gram/gallon of wine must. Follow the yeast set directions on the packet explicitly and/or see the separate “Yeast Set” instructions.
8. After you atemperate and add your yeast, cover your tank with a floating lid or your carboy or demijohn with an airlock. An air lock will allow the carbon dioxide to escape the container without additional air getting in to oxidize the wine.
9. Stir the juice every other day to re-suspend the yeast and nutrients. Keeping the yeast in suspension is important to give it access to sugar and nutrients and to avoid the production of H₂S.
10. If you are using additional yeast nutrients to assist in fermentation you will add them after fermentation has started. Fermaid O is added at the beginning of fermentation (1 day after yeast set) and all others (BSG yeast nutrient, Fermaid K, AnchorFerm) will be added at 1/3 depletion of the Brix (2/3 of the beginning amount of Brix). Follow the directions for the individual yeast nutrient, hydrating with water and mixing thoroughly.
11. If you are adding malolactic cultures to your wine (Chardonnay), you may also chose to do this at 1/3 Brix depletion. If using a malolactic nutrient (Opti-Malo Plus) with the bacterial culture, hydrate the nutrient in a separate container from the bacteria and add to the must directly before the addition of the bacteria. Follow all directions on the bacteria and nutrient packets explicitly.
12. Monitor the progression of the juice by taking daily hydrometer readings. Using a sanitized wine thief or syringe, pull a sample of fermenting wine that is large enough to fill the hydrometer cylinder. Always sanitize the hydrometer and the cylinder before taking a reading. Look to the meniscus of the wine surface in relation to the hydrometer for the most accurate reading. When the wine is fermented to dryness (0.90 Specific Gravity), is has completed its primary fermentation. Allow the lees particles to settle, and then rack the wine into a sanitized container. Be sure that the container is filled within ½” of the top to prevent air exposure. At this point, it is imperative to add ¼ tsp of potassium metabisulfite per 5 gallons of wine. The sulfites will kill off any harmful microbes and prevent the wine from oxidizing.
13 Steps to Making Red Wine from Grapes

13 Steps to Making Red Wine from Grapes
1. Sanitize and Crush and Destem – Inspect your grapes and remove any moldy clusters. Crush and destem into clean and sanitized food grade plastic tubs, stainless steel tanks, or glass carboys or demijohns. Always allow an extra 20% of volume for fermentation purposes as the wine will “expand” throughout fermentation. Always rinse your fermentation vessel with a sanitizing strength potassium metabisulfite solution (2oz/gallon or 3tbsp/gallon). Make sure that the sanitizing solution touches all the surfaces of the fermentation vessel and that the vessel is completely emptied out of all sanitizing solution after. Shake free any drops as best you can from the fermentation vessel. Having remaining sulfite liquid in the vessel will prohibit fermentation. Do not rinse the sanitizer off with water after sanitizing as that will reintroduce bacteria to the environment.
2. Once all of the grapes are crushed, try to accurately measure your quantity of must. Add ¼ tsp of potassium metabisulfite for every 5 gallons of must that you have. Mix up the must thoroughly.
3. Wait for 6-8 hours after the sulfite addition and then add pectic enzyme to the must. Musto Wine Grape offers generic pectic enzyme or Color Pro pectic enzyme that is specifically designed for red wine grapes. Follow the directions for the individual type of enzyme. Always mix it with water to create a 10% solution (if you use 5mls of enzyme, mix it with 45mls of water). The water allows it to better circulate throughout the must. Allow the pectic enzyme to work for 12 hours before yeast set.
4. Twenty four hours after crushing the grapes, mix the container thoroughly and take and record your measurements. Measure Brix, pH, and TA. If you need to adjust your must at all, this is the time to do it. Ideally your Brix should be between 23-28 degrees, the pH between 3.4-3.7, and the TA between 6-7g/L. Your initial Brix reading, multiplied by .55, will give you a close estimate of your ending alcohol by volume percentage.
5. If you would like to use fermentation tannins (FT Rouge, oak dust) or fermentation nutrients such as Opti-Red, add them after measurements and adjustments have been made. Musto Wine Grape packages FT Rouge and Opti Red in small packs for 5 gallon batches. If using oak dust, use 1/4cup for every 5 gallons of must. Mix any of these ingredients in thoroughly.
6. After measurements have been taken and any adjustments have been made, it is time to set yeast if you are using a cultured yeast strain. Use 1gram/gallon of wine must. Follow the yeast set directions on the packet explicitly and/or see the separate “Yeast Set” instructions.
7. After you atemperate and add your yeast, you may cover the vessel lightly with an old sheet or towel or place the lid gently on top of the bucket, if an airlock is in place. An air lock will allow the carbon dioxide to escape the pail without additional air getting in to oxidize the wine.
8. Obtain a must punch tool, a long stainless steel spoon, or your bare hands, and sanitize your tool or hands with sulfite sanitizer. This is what you will use to “punch down” or mix up the must three times a day. Try to mix everything very well, pushing all of the skins back down to the bottom, getting them very wet, and bringing up the piqued from the bottom. This should be done as often as possible, preferably three times a day. [Before work (7am), after work(5pm), and before bed (10pm)] When punching down every evening, take a sample of the liquid and using your hydrometer, track the Brix depletion. You should notice a drop in Brix daily.
9. If you are using additional yeast nutrients to assist in fermentation you will add them after fermentation has started. Fermaid O is added at the beginning of fermentation (1 day after yeast set) and all others (BSG yeast nutrient, Fermaid K, AnchorFerm) will be added at 1/3 depletion of the Brix (2/3 of the beginning amount of Brix). Follow the directions for the individual yeast nutrient, hydrating with water and mixing thoroughly.
10. If you are adding malolactic cultures to your wine, you may also chose to do this at 1/3 Brix depletion. If using a malolactic nutrient (Opti-Malo Plus) with the bacterial culture, hydrate the nutrient in a separate container from the bacteria and add to the must directly before the addition of the bacteria. Follow all directions on the bacteria and nutrient packets explicitly.
11. Punch down and take Brix measurements daily. When your hydrometer reads 0.90, you have fermented to dryness. At this point your malolactic fermentation may still continue, but the primary alcoholic fermentation is complete. You may now press the wine. Wash the press and sanitize using potassium metabisulfite. Again, make sure the press does not have an excessive puddles or lingering amounts of sanitizing solution remaining. Sanitize the receiving container (carboy, tank, demijohn, barrel) and any pumps or tubing that you may use. Anything that comes in contact with the wine should be rinsed with sulfite sanitizing solution. Place a screen or mesh (also sanitized) inside of the press to hold back any extra skins or seeds from getting through. Start scooping up the must and placing it in the press. Some of the liquid will immediately flow through, this is the “free run”. When the press is full, slowly begin pressing. Do not try and press every last drop out of the must as this can lead to seed cracking and bitterness in the wine. Fill each container to within ½” of the top and secure a bung and airlock in place. Malolactic fermentation will exude a small amount of carbon dioxide and there will be trapped gas within the wine that will need to escape the container.
12. Allow the wine to sit for 2-3 weeks. You can conduct malolactic chromatography or bring a sample to a winemaker at Musto Wine Grape for analysis to ensure that your secondary fermentation is finished. At this point you should see a nice thick layer of lees in the bottom of the carboy or demijohn. You will want to place the full vessel onto an elevated surface such as a table and place the new, sanitized, empty vessel on the floor below. Using a sanitized siphon, rack the wine into the new carboy. You may have space at the top which will need to be “topped off” with more wine. You can either use wine from another container, or finished wine to do this. It is very important that there is less than a 1/2” of headspace in each container. At this point you should also add 1/4tsp of potassium metabisulfite per 5 gallons of wine.
13. Now it is time to let your wine age. You will need to rack it and add additional SO₂ every 3 months. Make sure you sanitize all equipment and containers when racking and keep them topped off within ½”. Come visit Musto Wine Grape for bottling advice and supplies.
The Winemaker’s Think Tank: Vol 23 – How do I test for Acid?

What’s the Winemaker’s Think Tank?
Every Thursday we will post about a few frequently asked questions that our winemaker has answered. If you have a winemaking question you would like to have answered, please email us at support@juicegrape.com and we will try to get into next week’s post. Cheers! 🙂
How do I test for Acid?
When testing for acidity in wine, you are looking for the Total Acidity value, or the amount of acids in grams per liter of wine. While this may sound complex, it will help you in achieving a proper balanced flavor in your end product. You will need a few basic lab supplies: a test tube, a small 10ml graduated syringe, phenalthalein, sodium hydroxide. Draw a 15ml sample of the wine to be tested into the test tube. Add three drops of the phenalthalein. Swirl the drops around in the wine to mix it in thoroughly. (Note: When using sodium hydroxide, be very careful. It is a strong base that can cause burns. We suggest wearing eye and skin protection.) Using the 10 ml graduated syringe, slowly drop in the sodium hydroxide by .5ml at a time. Every drop, swirl the test tube contents to mix and observe any color reactions. Upon adding the drop, you will see an immediate color change, that will then dissipate. For white wines, you will observe a pink color and for red wines you will observe a grey color. Keep repeating the process of adding a drop, swirling and observing until the color change is permanent. The amount of sodium hydroxide used, when the color change is permanent, will give you the Total Acidity. If 6ml of Sodium Hydroxide are used, then the wine contains .6% or 6g/L of TA.
We hope this information helps with your winemaking. If you have any follow up questions or winemaking questions in general, please email us at support@juicegrape.com.
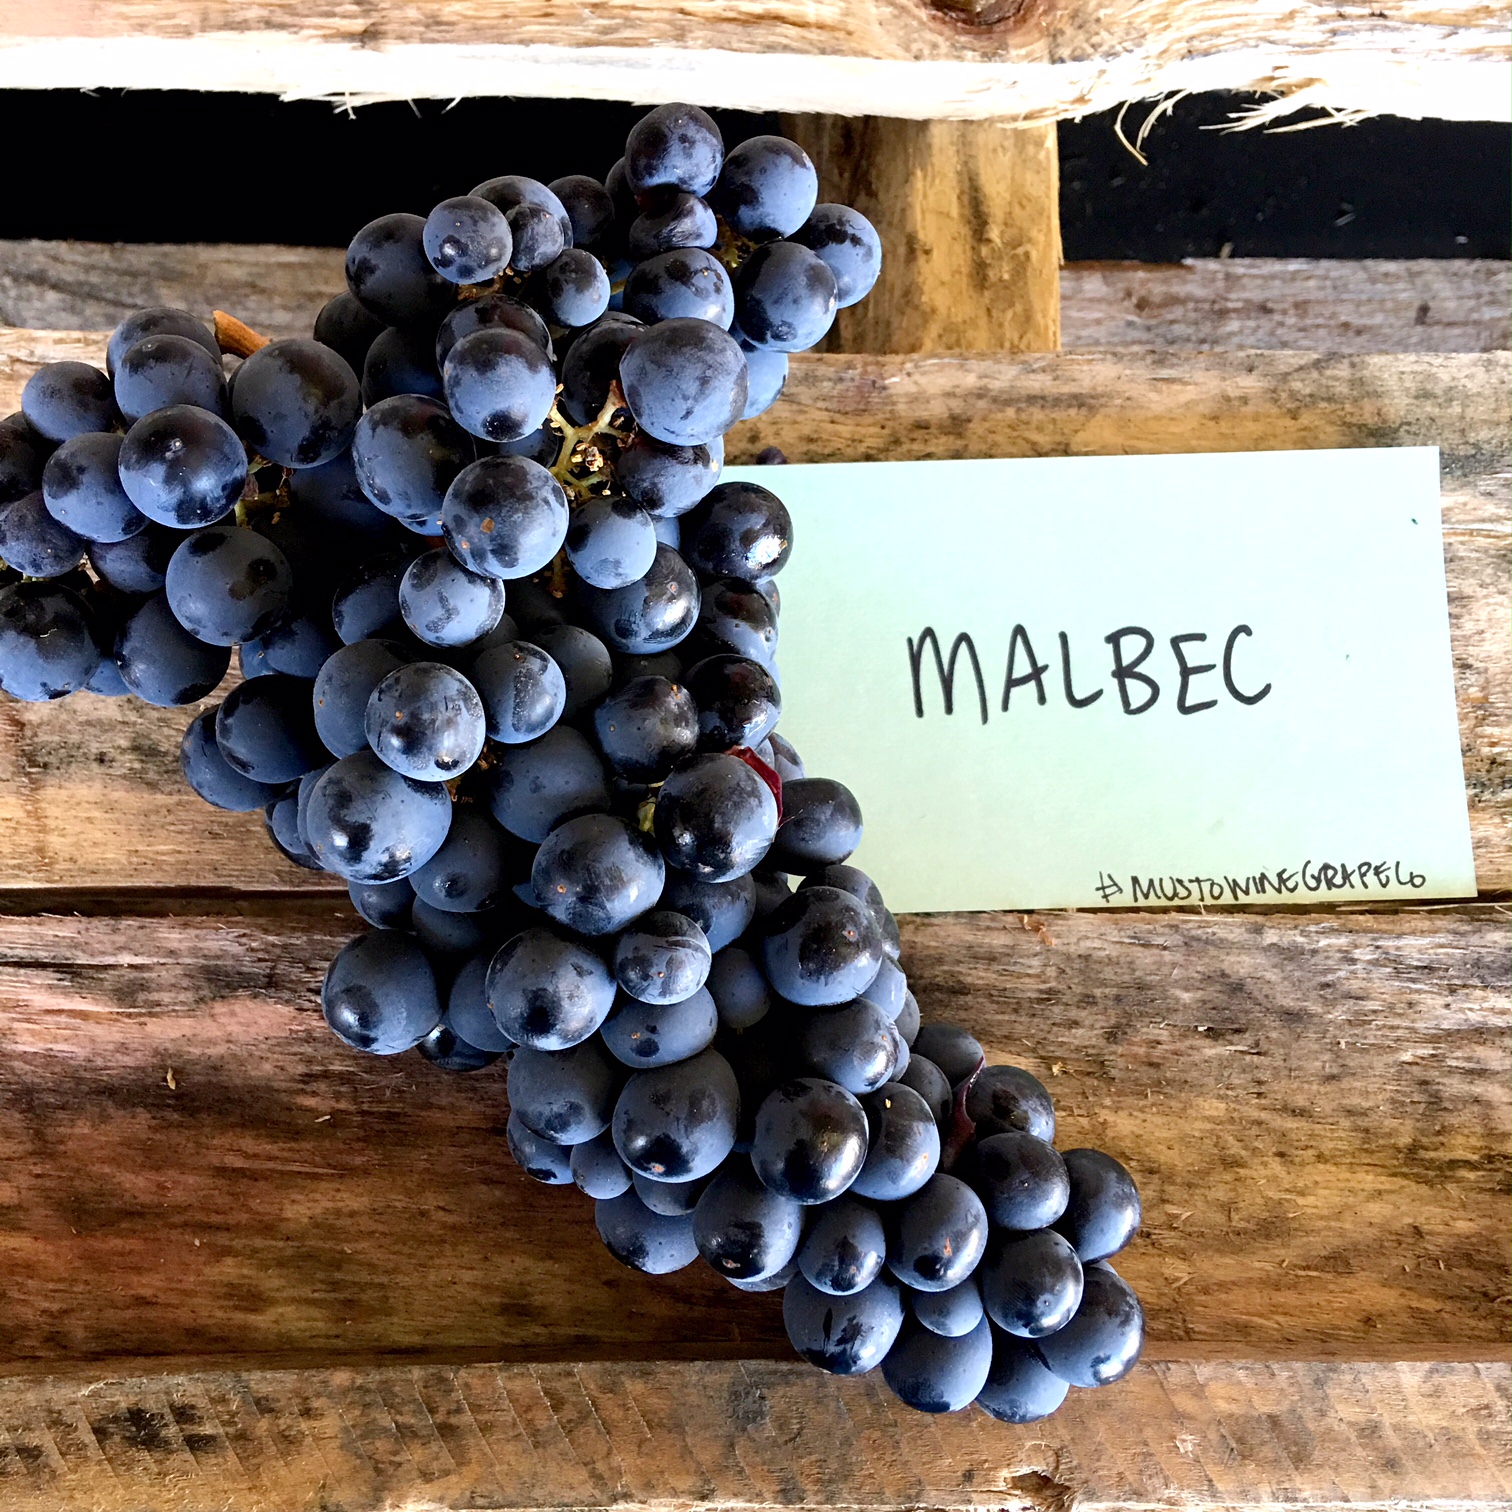
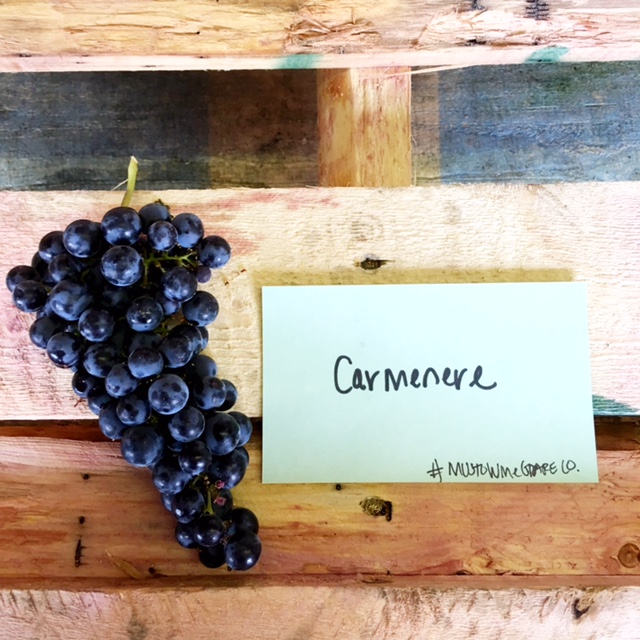
Carmenere, Cabernet Sauvignon, and Malbec Numbers

Hello Winemakers!
We hope everything is fermenting along well! Below are some numbers were able to take on the grapes yesterday. Cheers and Happy Fermenting! 🙂
pH= 3.55, TA= 4.27, Brix 21.5

pH= 3.85, TA= 3.31, Brix =23.5
pH= 3.95, TA = 4.25, Brix = 23.2
Official Pinotage Numbers Are Here

Official Pinotage Numbers Are Here
Brix = 25 (no adjustment required)
Starting pH = 3.91
Starting TA = .62
Added 1.5gm Tartaric Acid per liter
Final Number are pH = 3.50 & TA = 0.75
In conclusion, the final numbers are very good!! Looking forward to seeing how this vintage turns out!
#whydoesittakesolong?
Bring On The Bordeaux! – A Home Winemaking Experience (2)
")
So before we start going into how our wine is doing, we wanted to outline some winemaking terms. Here’s a mini wine vocabulary lesson.
Degrees Brix: Expresses the percentage of sugar by weight. This scale is on a Triple Scale Hydrometer. Measuring the Brix by using a hydrometer will help you determine the level of alcohol you wish to produce in your wine.
pH: This is the potential Hydrogen ion. The pH scale spans from 0, representing extreme acid, to 14, representing an extreme base or alkai. For winemaking purposes only the 0-7 scale is considered and wine should between 3-4. The more intense the wine acid is, (the lower the number) the less free sulfite is needed to afford proper protection and hence wine stability.
Total Acidity: This measurement refers to the amount of acid that is in your wine in grams/liter of percent of volume. Ideally, your TA should be between 0.65%-0.85% for white wine and 0.60%-0.80% for red wines. If the acid is too low your wine is susceptible to bacteria and spoilage. If it is too high your wine will taste too tart.
We took the must out of the cooler on 10/28 and waited for the must to heat up. Once the must started to heat up we took our measurements. The Brix were 25.5, TA was 5.985, and pH was 3.88. My pH is a little on the higher side. My TA is pretty good for a dry red and my Brix are at a great level to make a 12.5% alcohol per volume wine.
Some tips for taking your pH and TA measurements. I would suggest purchasing some type of all in one SO2, pH, and TA testing equipment. To test TA on your own can be very complicated and not very accurate. I would suggest looking into a Vinmetrica kit. They do all of the tests and it’s easy and accurate.
Also, try not to get distracted and mix up your solutions like I did. It took me 30 minutes to get the correct TA reading because I was mixing in the wrong solution. #airheadmove
Thanks again stopping by and checking out our winemaking process. The next post will concentrate on yeast, yeast nutrient, and other additives that help the wine during fermentation.
Cheers ~ CM & FJ
Recent Comments