


How to Make Syrah Wine from Chilean Wine Grapes

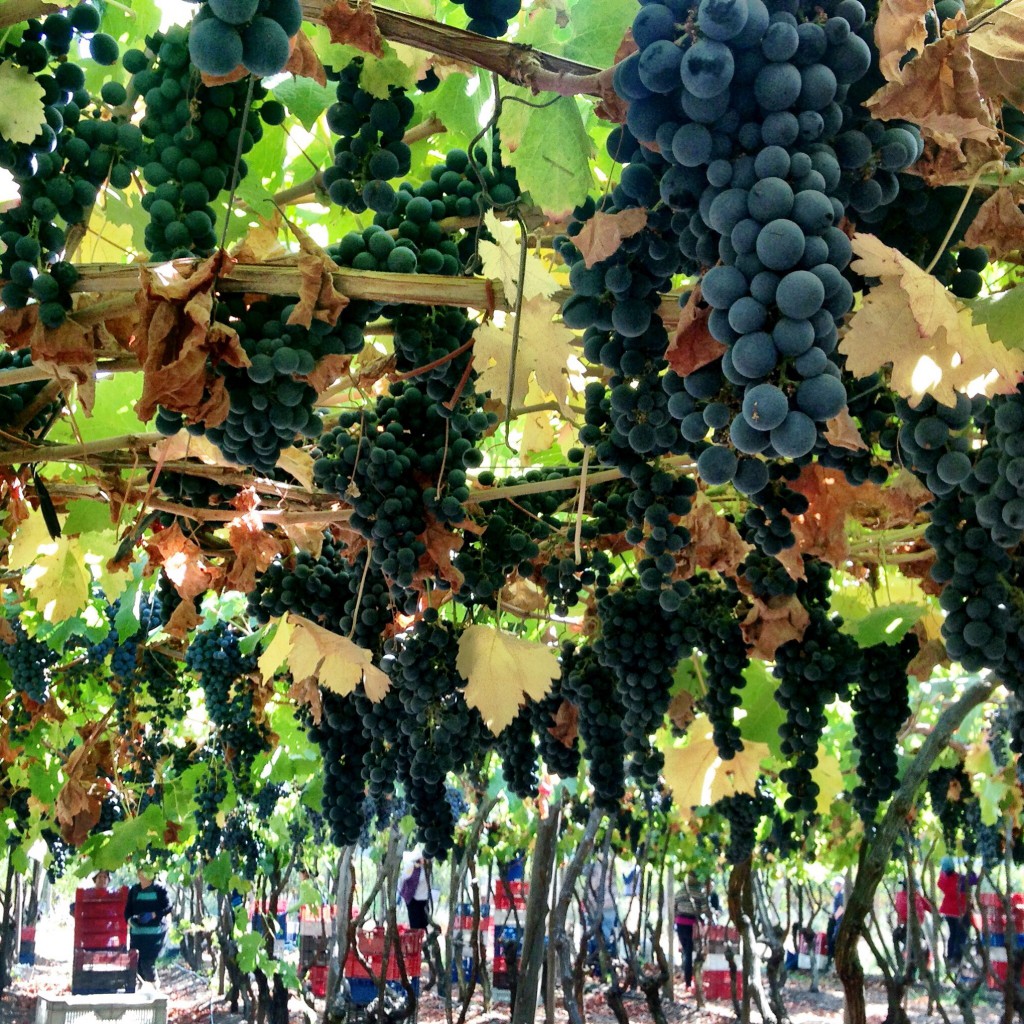
Chilean Syrah from Colchagua Valley has received high praise from publications like Wine Enthusiast, earning 93+pts. It’s a wine variety that is often overlooked from Chile and is a wine worth making this season. Chilean Syrah boasts flavors of plum, wild berry, and earth aromas. I highly suggest introducing this wine to oak barrels or an oak infusion. The medium acidity and powerful aromas are complemented by the French Oak flavor profile.
Yeast Suggestion: CSM yeast
Oak Suggestion: French oak barrels or chips
Wine Flavor Profile: Bold, medium tannins, blackberry, plum, wild berry, leather, smoke, chocolate, and oak
How to Make Syrah Wine from Chilean Wine Grapes:
- Crush Syrah grapes into a sanitized bin or tub. (Each 18lb crate will make 1.25 gals of finished wine).
- Apply 50ppm of Potassium Metabisulfite and stir well. Allow to sit for 8-12 hours.
- Apply .5ml of Color Pro Pectic enzyme per box diluted into a 10% solution with water to the must and stir. Allow to sit for another 8-12 hours.
- Mix Booster Rouge, FT Rouge, and Opti-Red, with spring water until it is the consistency of pancake batter and pour over top of crushed grapes. Mix in well.
- Add rehydrate CSM yeast (1g/gal) with Go Ferm rehydration nutrient and warm water. Allow to sit for 15 minutes and pour over top of crushed grapes.
- Punch down grapes 3 times per day throughout the duration of fermentation and monitor temperature and Brix levels daily. Use a hydrometer to test sugar content in a strained juice sample. Make sure the temperature does not exceed 85F.
- One day after adding the yeast, add Fermaid O, mixed with spring water into the pancake batter style slurry. Dump into grapes during a punch down.
- After the depletion of 1/3 of the Brix (when the Brix level is between 16-11), add Fermaid O that is mixed with spring water into the pancake batter style slurry. Dump into to grapes at a punch down.
- Add Malo-lactic bacteria the same day as the Fermaid K. If you are using liquid cultures, just pour over the grape must and mix. If you use the dry cultures, rehydrate them in warm spring water according to their specific directions, utilizing any rehydration nutrients recommended.
- When the Brix have dropped below zero, press the wine into a sanitized tank, carboy, or demijohn. Make sure the vessel is topped up all the way to the top of the neck and sealed properly with a bung and airlock.
- Rack after 48 hours and then again in a week. Allow MLF to complete before adding sulfites.
- Allow the wine to age and rack it every 2 months and add sulfites when racking.
- Add oak infusion after 2nd or 3rd racking. Taste test along the way until the oak profile is where you want it to be.
Interested in making your own wine? Musto Wine Grape Company is here to help! Musto’s New England’s largest supplier for home winemaking products and services. Visit juicegrape.com or give us a call at (877) 812 – 1137 to learn more.
What is Bud Break?

Happy first day of Spring Winemakers!
Our California grapes are starting to go through bud break.
Here is a nice view of our Cry Baby Thompson Seedless and Grenache grapes “waking up” 🍇
What is Bud Break?
Bud break is the start of the grape vine’s annual cycle. It is a relaxing time in the vine’s life as long as they don’t experience any intense weather occurrences, such as frost. Frost can kill the buds or delay their growth.
Check out what Bud Break looks like in Chile! (link)
Interested in making your own wine? Musto Wine Grape Company is here to help! Musto’s New England’s largest supplier for home winemaking products and services. Visit juicegrape.com or give us a call at (877) 812 – 1137 to learn more.
Product Spotlight: CSM Yeast

Product Spotlight: CSM Yeast
CSM yeast was derived from Bordeaux and helps create a vibrant aromatic profile. CSM aids in adding complexity to the palate and pairs well with malolactic fermentation.
Why you want to use it:
It’s the perfect yeast for the Chilean fruit. It reduces vegetal aromas, adds complexity, stabilizes color, and helps increase the aromatic profiles of berries and spices.
Use Tips:
Fermentation starts quickly with this yeast. Be prepared to see Brix drop 24 hours after inoculation. It can stand up 14% ABV and can handle temperatures from 59–90°F. However, I highly suggest keeping your fermentation temps lower than 75°F. Once you hit 80°F you lose aromas and “burn off” flavors. Keeping your wine between 59–75°F during fermentation is a best practice.
You also want to use nutrients when using CSM; nutrients such as Fermaid-O and Fermaid-K. CSM tends to produce H2S (rotten egg smell) if there aren’t enough nutrients during fermentation.
Avoid cold shocking the yeast at inoculation. You’ll want to get the must and the yeast starter within a few degrees of each other before pitching the yeast starter. But without temperatures falling lower than 55°F. Temps below 55°F could stall fermentation and/or kill the yeast.
Goes best with:
CSM was cultivated to help ferment Cabernet Sauvignon, Cabernet Franc, Grenache, Merlot, Sangiovese, Petit Verdot. However, we have seen it used on Carmenere, Malbec, and Syrah from Chile with great results.
Dosage:
6gm/gals
Flavor Profile:
Cherry pit, raspberry, blackberry, spice, violet, bark, and sweet pepper
Ready to make wine? Musto Wine Grape Company is here to help you make the wine of your dreams! The Spring South African & Chilean winemaking season starts soon! Secure your winemaking grapes or juices and give us a call at (877) 812-1137 to speak with one of our Musto Crush Crew members. We can get you set up with everything you need and provide customer support along the way to ensure your success!
What are Fresco Winemaking Juices?

What are Fresco Juices?
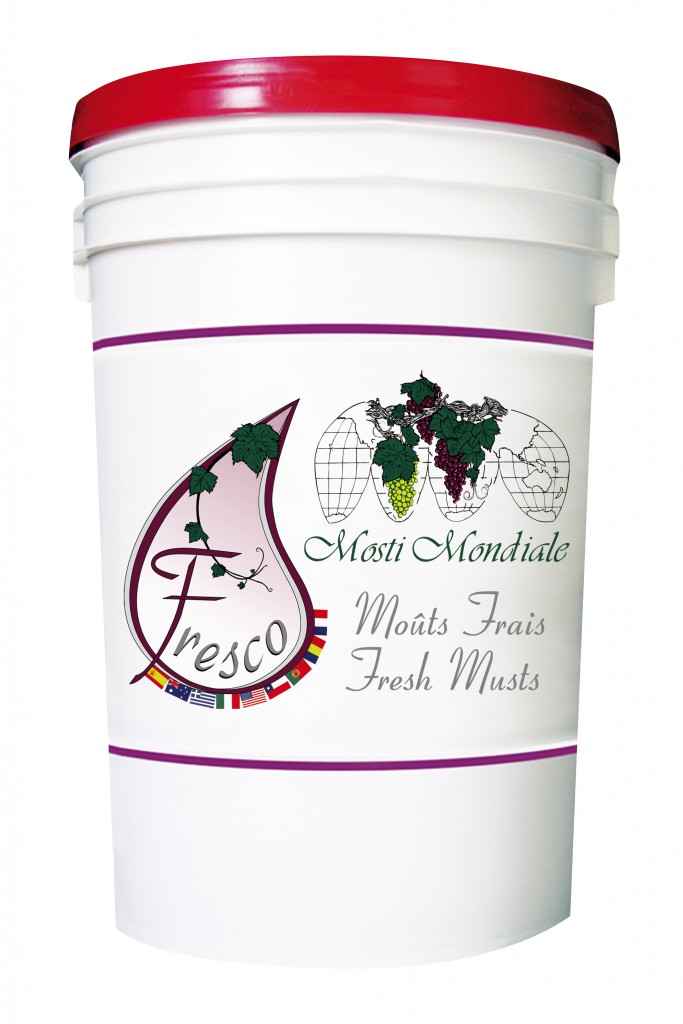
Ever bake a cake from a box and it came out delicious? Did you know you could do the same with winemaking?
Mondiale Fresco is proud to be the only product to offer home winemakers their own vineyard in one unique package. Each pail of juice is pre-balanced and adjusted to ensure you have the best winemaking success possible. Just warm up the juice to fermentation temperature and watch it go.
What does “pre-balanced” and “adjusted” mean?
Every season Mother Nature gives us a different wine grape harvest. Some years the acid, pH, and sugars are all in line with each other. Most times they aren’t and there needs to be some slight adjustments made pre-fermentation to ensure top wine quality. The Fresco juices are adjusted so that the acid, pH, and sugar levels are all in balance with each other. This makes for an easier fermentation and, a very pleasing wine.
Depending on the varietal of wine you choose, enzymes and tannins might be added – all pre-measured, and ready-to-go, just open the packet and add to the pail. These add-ons help with wine clarity and mouthfeel, contributing to the “taste like made from scratch”, or in this case, as if fermented on the skins. The Fresco juices are the best juices to work with for busy winemakers. You get the juice warmed up, watch it ferment, age, and bottle.
No muss, no fuss. Just delicious wine. Click HERE to via our list of Fresco Juices.
Fresco Juices are Pre-Order ONLY. Give us a call at 877-812-1137 to secure your Fresco Juice order.
Wine Spotlight: Greanche Blanc

A new grape has been added to our winemaking portfolio from Cry Baby – Grenache Blanc!
This grape is widely planted in Spain and the Rhone Valley.
It produces wines with good alcohol content, low acidity, citrus and herbaceous notes. A great blender for Rousanne or Muscat.
It’s best to ferment at low temperatures in order for the bouquet to flourish.
Interested in trying a new white wine this season? Email sales@juicegrape.com
Lodi Rules: Grow great grapes, make delicious wine, leave everything a little better than we found it

“May we farm in a way that meets the needs of today without compromising the ability of future generations to create their livelihoods.” – The LODI RULES motto.
Started in 2005, the LODI RULES certification program is a collective of growers who are focused on all thing’s sustainability. Many of these Lodi Farmers are 4th or 5th generation winegrowers who are focused on farming with the next 100 years in mind. We at Musto Wine Grape, are lucky enough to work with some of these amazing farmers – Mettler Ranch and Costamagna Vineyards. Look for the LODI RULES seal on the wine grape boxes this season.
LODI RULES growers use a unique risk model to quantify the environmental and human impact of all pesticides applied in the vineyard. This model considers the dietary risks to consumers, as well as the acute risk to farm workers; small aquatic invertebrates; birds; and bees; and bees and beneficial insects. The Lodi region has documented a great decline in the use of high-risk pesticides since 1992, thanks to sustainability adaption by farmers.
LODI RULES Sustainability Standards Overview:
- Water: They carefully manage the quality and efficiency of their water, appreciating every drop
- Soil: They do their part to make sure that soil – the foundation of the vineyard- thrives for generations to come
- Community: They support the neighborhoods and schools around the farms
- Ecosystem: They encourage biodiversity and act as stewards of the land
- Pest Management: They us an integrated approach to pest management, which includes protecting beneficial insects and minimizing risks to birds, bees, water, and people
- People: They make sure that their vineyards are a safe and rewarding place to work
- Quality: They design farming practices to improve wine grape quality
- Generational Farming: They farm with the next 100 years in mind
How is certified sustainable farming different than organic and biodynamic?
- Organic and biodynamic farmers follow a set of practices related to the environment. Certified sustainable farming includes practices related to the environment, the people, and the business.
LODI RULES has over 100 sustainable practices included in its certification; with over 28,776 acres certified.
Over 150 wines bear the LR seal (Mettler Ranch & Costamagna being some of them!) A wine must contain 85% certified grapes to be the LR seal.
“Sustainability means leaving everything – people, places, etc.- as good as better than how we found it” – Kevin Philips, Michael David Winery
“When you drink a glass of wine made from LODI RULES certified grapes, you are supporting a farmer, a vintner, and an entire agricultural community that embraces their responsibility to care for the environment and the people”
This is a certification I think we can all get behind. Musto Wine Grape is grateful to be bringing in these grapes this season. If you are interested in grapes from the LODI RULES program, please give us a call at 877-812-1137 to pre-order. We are looking forward to assisting with your winemaking this fall!
Grapes Available from LODI RULES Certified Vineyards:
Mettler Ranch:
- Barbera
- Cabernet Sauvignon
- Grenache
- Merlot
- Pinot Grigio
- Pinotage
- Petite Sirah
- Rousanne
- Sangivoese
- Syrah
- Viognier
- Zinfandel
Costamagna Vineyards:
- Old Vine Primitivo
- Cabernet
- Merlot
- Sangiovese
- Barbera
- Aglianico
- Montelpulciano
- Mourvedre
- Nero D’Avola
- Sagrantino
Cheers,
Christina Musto-Quick
Special Primitivo coming from fifth generation farmer Berton Costamagna

Special Primitivo coming from fifth generation farmer Berton Costamagna
There is something very special about walking through this Primitivo vineyard for fifth generation farmer Berton Costamagna. “Since 1902 my family has been here in Lodi farming these wine grapes”, says Berton. “To think that my Nono (Great, Great, Great Grandfather) had the foresight to start a farming adventure back then, by planting his first vineyard of Primitivo here, and to see where it is now, is so inspiring to me.” With its sandy loams, and ideal climate, farmers back then quickly saw the potential for growing wine grapes in Lodi, in the heart of California. Fast forward 120 years, and Lodi California has come to be known as the Zinfandel Capital of the World, and is now one of the top producing AVA’s in the world. The Costamagna family has continued farming their family’s clone of Primitivo for all these years for wineries and home winemakers to enjoy with their families. “These grapes make for a great wine, but what is truly special, is these grapes connect us to the hard work, traditions, and memories of my family before me. My hope is that folks can make as many memories drinking the wine from these grapes as our family has made farming them.” 🍇🍷 We can’t wait to receive these grapes from the Costamagna Family!
How to Order
We are an old school company. Give us a call at 877-812-1137 or email us at sales@juicegrape.com to get the ball rolling on your pre-order. Don’t forget, we can create custom fermentation templates for you if you would like!
If you aren’t local to New England and need your product shipped, please email sales@juicegrape.com for a freight quote. We will be shipping out of our Bronx, NY location – D’Arrigo. If you live in the Metro NY area and are interested in a freight quote please reach out to sales@juicegrape.com
Unfortunately, we cannot ship fresh juice. We can ship our sterile juices (Original All Juice (juicegrape.com)), they ship year-round without refrigeration. This is the best option for home winemakers who cannot pick up the fresh product from MWG’s facilities.
If you have a large fresh product order (2,000lbs and up), please contact sales@juicegrape.com for a freight quote.
For more information regarding the Fall Harvest please feel free to contact us at sales@juicegrape.com or give us a call at 877-812-1137. We are looking forward to helping you with your next great wine!
Sincerely,
Christina Musto
Musto Wine Grape Co.
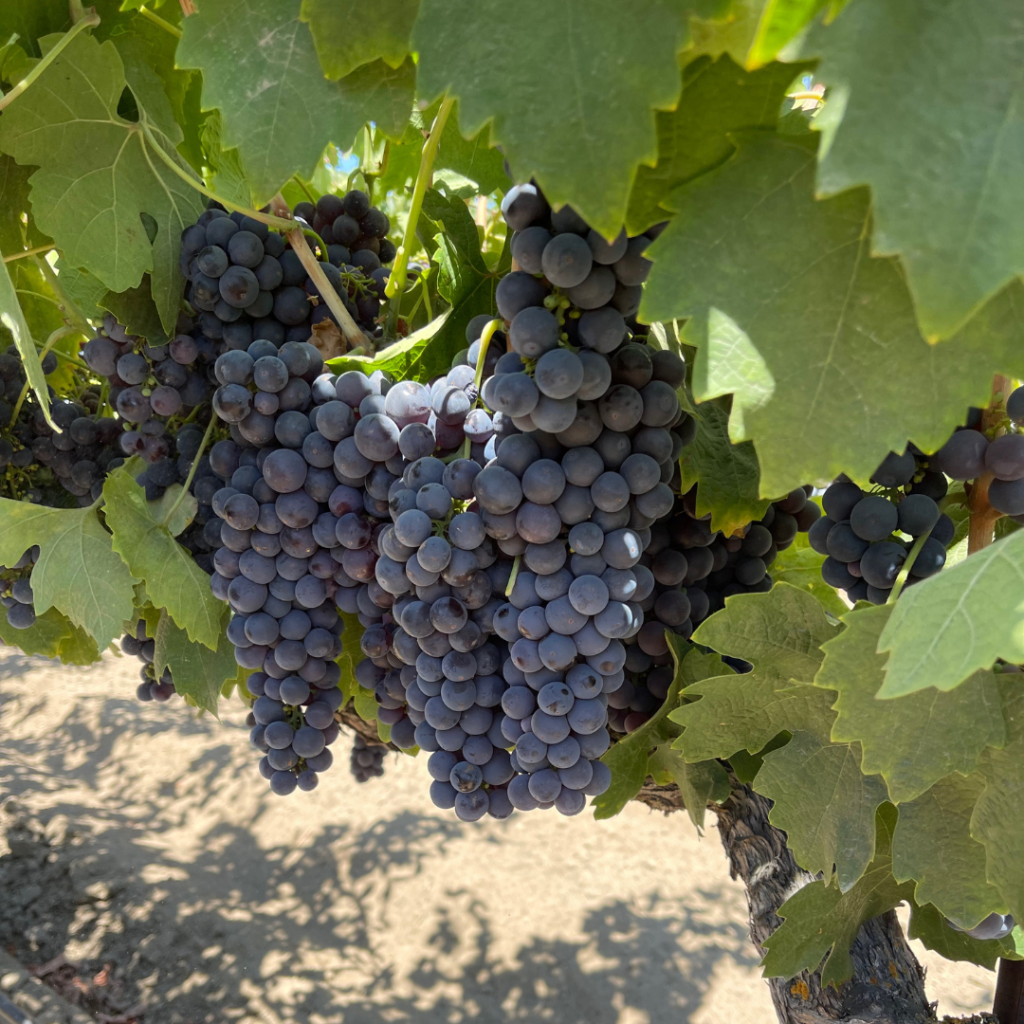
How Much Wine will a Case of Grapes Make from Chile?

Each case of wine grapes from Chile is 18lbs. Depending on the grape variety, you should yield about 1.5-2 gallons of must per case.
However, keep in mind that certain wine grapes are “juicier” than others. For example, Syrah is considered a “juicer” grape than a Cabernet. If you look closely, you can see the difference in the shape of the berries. The Syrah grape has more of an “egg” shaped berry to it. The Cabernet is more of a circle shaped berry. The berry size, climate, soil, and vineyard practices will all help determine how much juice is produced in each berry, and the berry intensity.
Usually each case of 18lb wine grapes will yield about 1.25-1.50 gallons of finished wine.
That equates to about 7 bottles of wine.
Other factors that influence how much must and/or juice you yield per case:
How your rollers are positioned in your crusher destemmer
How much you press after fermentation is completed
How much wine you loose during racking
If you barrel age your wine
If drink a lot of wine during bottling
Keep these topics in mind when you are deciding on how many cases of grapes you want purchase versus how much wine you want to make. If you ahve any questions do not hesitate to reach out to us via email (sales@juicegrape.com) or phone (877-812-1137).
EC-1118 Wine Yeast: Product Spotlight

What makes EC-1118 so great?
EC-1118. It’s an excellent strain to be used in a wide variety of wines. This includes red and white, including sparkling, fruit wines, late harvest wines and cider. It has a strong competitive character that will inhibit wild yeasts, and restart stuck fermentation due to it’s great alcohol and sulfate tolerance. Being a very neutral yeast, it will have very little effect on the varietal character of the grape. It ferments fully, and flocculates well, producing compact lees. It has extremely low production of foam, volatile acid and hydrogen sulfide (H2S) and it ferments well over a wide range of temperatures (50 to 86 degrees Fahrenheit), making it one of the most favorable and popular wine yeasts.
Considering EC-1118 for your next wine batch? Click here to be directed to our store to purchase online, or call us at (877) 812 – 1137 to place an order with one of our associates. We can also provide a step-by-step instructional for re-hydrating your yeast and adding it to your wine. Whether you’re a newbie home winemaker or a pro, we’re here to help!
Air Fryer Buffalo Cauliflower Bites

Air Fryer Buffalo Cauliflower Bites
If you’re obsessed with wings like I am, but are looking for a healthier alternative, try these air fryer buffalo cauliflower bites! Cauliflower has a similar texture to potatoes, but without all the carbs. There are a few way you can prepare these, but I’ve been obsessed with my air fryer lately so that’s what I’ll be using for this recipe.
What you’ll need:
About 5 cups of cauliflower, chopped into florets
Buffalo Sauce – Frank’s Mild Buffalo sauce is my all time favorite!
Unsalted butter
How you’ll do it:
Spray the cooking basket in the air fryer with some non stick cooking spray
Add the cauliflower and cook at 375 degrees for 15 minutes. Toss the cauliflower and add back in for about 5 minutes if they aren’t crispy yet. (Try cooking the cauliflower in smaller batches if they come out soggy – I’ve noticed if you over pack the air fryer they tend to not crisp evenly.)
Add cold butter to the warmed buffalo sauce and add to a large bowl, and pour the sauce mixture on stop and toss to fully coat.
Serve with blue cheese dressing for dipping and carrots and celery sticks to serve on the side.
The impossible pairing:
Yes, you can pair a wine (actually, quite a few!) to go with your buffalo dishes. A slightly sweet white wine will compliment the buffalo sauce the best. Reach for a Champagne, Moscato D’Asti or a Riesling. The fruity flavors and the low level of tannins really works with the buttery spice and they also help with the heat!
Recent Comments