2023 Chilean Winemaking Harvest Update
2023 Chilean Winemaking Harvest Update

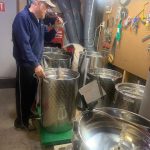
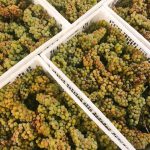
{above photo from our trip to chile a few years ago}
Hello, Winemakers! It’s time to get ready and prepped for the Chilean grape and juice arrival. The Chilean Winemaking Season starts in early April and ends in May. Our growers have planned to start harvesting white wine grapes around March 15th and red grapes around March 23rd. Once on the boat, we will have a better update on delivery timing.
Musto’s 2023 Chilean Offerings:
Chile Grapes: Cabernet Sauvignon, Cabernet Franc, Carmenere, Malbec, Merlot, Petite Verdot, Pinot Noir, Syrah, Chardonnay, Pinot Grigio, Sauvignon Blanc, and Viognier
Chilean Juice: Cabernet Sauvignon, Cabernet Franc, Carmenere, Malbec, Merlot, Petite Verdot, Pinot Noir, Syrah, Chardonnay, Pinot Grigio, Sauvignon Blanc, Viognier, and Muscat.
Chilean Viticulture:
Chile is the same latitude as northern California! Chileans can grow many different types of grapes here, just like in California. The cooling influences they receive from the Pacific Ocean, the Andes Mountains, and the warm and plentiful sunshine attributes to their wine-growing success. Their warm Mediterranean climate helps the grapes to ripen. The Humboldt current, flows up from Antarctica, along the Chilean coast, pushing the cool air inland by the wind patterns. This cooling effect helps cool off the grapes while they mature. Colchagua and Curico Valley both benefit from this ocean influence, which allows these regions to produce grapes from fertile soil for wines that are gaining premium reputations.
The Curico and Colchagua Valleys have some of the best soils in Chile, composed of mostly sand, clay, decomposed granite, and volcanic-alluvial. These regions only receive around 23.3 inches of rainfall per year and little to no rainfall during their summer months. The grapes are safe as harvest approaches, and the weather ensures that the grapes are fighting for water and creating a more intense fruit.
What are Brix?
The harvest is based on sugar levels in the grapes. This information comes from a simple measurement called degrees brix (also known as specific gravity). It’s important because it tells us how much water is present in our must (the mixture of crushed grapes and yeast starter). The lower this number is, the more concentrated or “dry” your wine will be when finished fermenting. The ideal Brix levels for red wines is 23-25 Brix, and for white wines 21-24 Brix.
How are the grapes harvested?
The grapes are handpicked. The pickers walk through rows of vines looking for clusters of ripe fruit to cut off with long-handled knives called “cortadores.” They then gently place these into plastic tubs where they’re carried back to trailers parked nearby–a process that takes place over several days (usually during the morning). Once all of this has been completed successfully, we begin our shipping process!
How do you know when to harvest the grapes?
The wine grape harvest is based on sugar levels in the grapes: if they’re too low you can’t make good wine; too high and it will taste too sweet and you’ll most likely have a stuck fermentation. Each month/week/and as harvest nears, day – the grapes are sampled in the field to see if they have reached their optimum levels yet.
Shipping from Chile to MWG…
Once the grapes arrive at port they are sent to Musto Wine Grape Co. and we unload them into our coolers. Everything is shipped in a refrigerated container and never breaks the cold chain. This ensures that the high quality of the fresh Chilean products are intact. After they arrive it is time for you to pick up your grapes and/or juices and get winemaking!
2023 Chilean Harvest Update:
The Chilean crop looks excellent this season. We are hoping to see the Chilean grapes and juices arrive at around 23-25 Brix, very sweet and juicy. Arrival dates look to be somewhere at the end of April / early May depending on the type of winemaking grape/juice. Give us a call (877-812-1137) or email us at sales@juicegrape.com with any arrival questions.
Fun Fact About Chile: Chile produces more than 1 million tons of grapes every year!
Chilean wine making is a time-honored tradition, and the results are worth it! This will be 18+ years of Musto Wine Grape working with our Chilean vineyards and every year the wines created get better and better. We hope you enjoyed learning about the Chilean wine-making season. It’s an interesting process that requires a lot of work, but in the end, it pays off with delicious wines!
For more information on making wine from Chile check out these blogs posts:
- 7 Tips for How to Prep for the Chilean Wine Harvest
- Bud Break in Chile
- How to Make Chilean Cabernet
- Crushing Chilean Malbec Grapes
- Making Chilean Carmenere
- Wine Spotlight: Chilean Carmenere
- How to Make Wine from Chilean Juice
- How Much Wine Will A Case of Grapes from Chile or South Africa Make?
- Details from Our Trip to Chile
- Notes on Making Sauvignon Blanc from Chile
- Video About Curico Valley
- Winemaker Interview with Manuela Astaburuaga from Our Chilean Vineyards
- Our Wine Grapes of Chile Video
Can I make my own? Musto Wine Grape Company is here to help you make the wine of your dreams! The Spring South African & Chilean winemaking season starts soon! Secure your winemaking grapes or juices and give us a call at (877) 812-1137 to speak with one of our Musto Crush Crew members. We can get you set up with everything you need and provide customer support along the way to ensure your success!
A Guide to Cabernet Sauvignon
What is Cabernet Sauvignon?
Known as the king of red grapes, Cabernet Sauvignon enjoys the same regal status in California as it does in its native home of Bordeaux, France. Californian Cabernet Sauvignon tends to be more fruit-forward and mellow, with rich dark fruit notes. The most common aromatic and flavor components found in this varietal are plum, black cherry, blueberry as well as warm spice, vanilla, black pepper, and tobacco. Aside from being known for its dark color and full body, it’s known for often being over 13.5% in alcohol content. The average alcohol content of a Cab from California floats around 14.5%. At Musto Wine Grape we carry a variety of Cabernet Sauvignon grapes from multiple AVAs in California, as well as all of the yeasts, nutrients, and equipment you’ll need.
What kind of yeast should I use when making Cabernet Sauvignon?
*Note that full expression of the desired characteristics for any of the following yeast strains is based on proper care and feeding if the yeasts, along with using quality fruit and good winemaking practices. It is also strongly recommended that Go-Ferm and Fermaid-K are used as well as temperature management throughout the entire fermentation. As always, if you need assistance with any part of your winemaking process, do not hesitate to reach out to us at sales@juicegrape.com or give us a call at (877) 812-1137 to speak with someone who can assist with any product recommendations, procedures, or problems.
BM45 yields a big mouthfeel, notes of cherry liquor, rose petal, jam, plum, berry as well as earthy and spicy elements. It offers color stability and helps to minimize vegetative characteristics.
BDX is an all-around great choice for berry, plum, and jam characteristics. It has a moderate fermenting rate and offers good color retention. By re-enforcing existing tannins, it develops structure in the wine. Because of this, we advise to not use with unripe fruit.
RP15 emphasizes the berry aspects of the fruit, along with color stability, increased mouthfeel, and agreeable tannins.
D254 yields a big mouthfeel and rounds tannins as well as intense fruit. It has a focus on berry and jam characteristics, but more so of dried fruit than fresh. It’s also great for color stability and adds body to blends.
D80 offers big volume and fine grain tannins. It is great for encouraging more positive tannin intensity to a blend.
Where do you source your Cabernet Sauvignon from?
We offer Cabernet Sauvignon from multiple AVA’s within California and Washington:
Lanza-Musto Vineyards in Suisun Valley, CA (Valley, 169, 15, and Koch)
Mettler Family Ranch in Lodi, CA
Napa Valley, CA
Washington State (Clone 33)
Sonoma County, CA (Chalk Hill)
Amador, CA
King’s River, CA
Paso Robles, CA
Central Valley, CA
Is there a certain winemaking procedure specific to Cabernet Sauvignon?
You can follow our Red Wine Grape Procedure which you can find here, if you are using juice you can find the procedure here and if you are using frozen must, here. The procedure is standard for making red wines, but using the proper yeasts and nutrients specific for Cabernet Sauvignon and consistent monitoring will have the biggest impact on your final wine.
Where can I buy grapes, juice, or must?
At Musto Wine Grape Company, all red grape varieties are available in 36lb cases, in frozen must by request, or in 6-gallon fresh juice pails. For Sterile Juice options that can be shipped year-round and without refrigeration click here.
Finally, if you need the best options and equipment suited for you and your winemaking goals, email sales@juicegrape.com or call (877) 812 – 1137 to speak with one of our Musto Crush Crew members who can help. We are here to provide all of the winemaking products you need to make the wine of your dreams, as well as the customer support to ensure your success!
How to Set Up Your Home Winery
Setting up your home winery
There are two factors to consider when you decide to build your home winery.
- How much money are you willing to spend to buy more equipment, build rooms, or add air conditioning?
- The second factor is how much room do you have to create your winery?
I converted my entire basement into a winery. But, I did it slowly, one room at a time. Let me walk you through that and see if what I have done could apply to your place for a home winery.
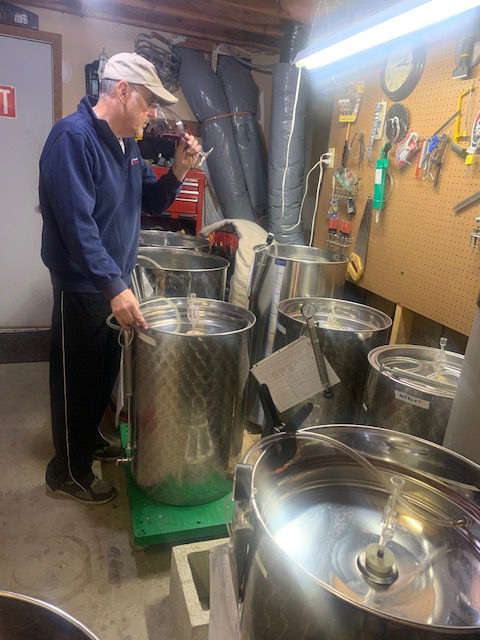
I have a room which holds my variable capacity tanks and carboys. This wine is aging and waiting to be moved into barrels. This room is air conditioned due to poor cellar temperatures at my home. I also have a sink in this room for cleaning and washing. I added a five foot counter to do all my lab work. Wine racks were added to the walls above the tanks to store all my 375ml bottles of port.
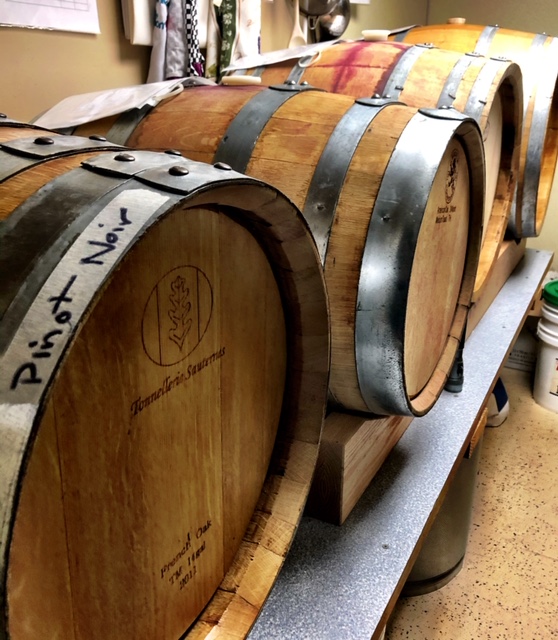
The next room I built was a barrel room. I finally took the step to barrel age my reds and have never looked back. The barrel aging makes the wine so soft and complex. I have seven barrels ranging from 15 gallons to 30 gallons. I suggest you stay in this range as a home winemaker. They are easier to handle and clean. You must also remember, you will need wine on “standby” to place into the barrel once you remove the existing wine to bottle. Plan well.
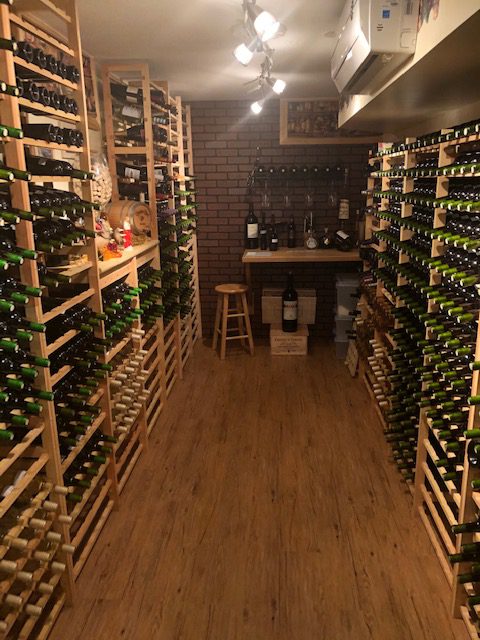
My final room was needed to store all the wine moving out of the other rooms – a bottles storage room. I bought wooden wine rack kits online, and after assembly I bolted them to the walls. I then put down a floor, nice lighting and a bit of decorating to tie it all together. The most critical thing I added was air conditioning, because bottle storage needs four things – cool constant temperature, darkness, proper humidity and no vibration. All the bottles are lying horizontally and peacefully aging.
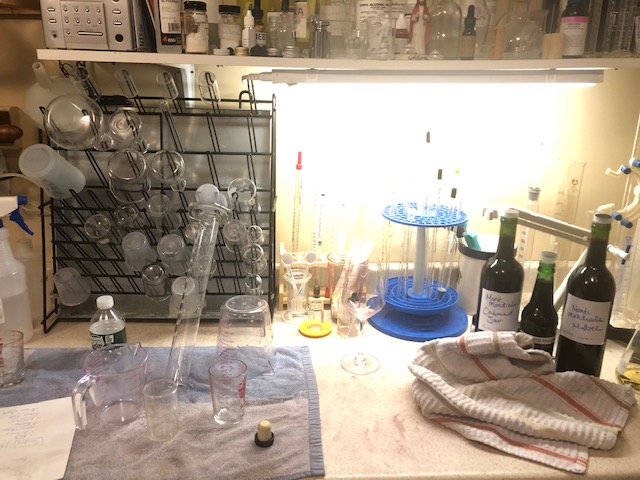
Besides proper areas to process your wine, you also need the tools to take care of this wine. Some of the “must have” tools are hydrometers, pH meters, pipettes, burrette, stir plate and an SO2 meter. These tools are needed to balance your grapes perfectly before pitching the yeast. They are also needed to adjust and protect your wine as it is aging.
Be sure to have other supplies on hand such as tartaric acid, potassium metabisulfite, fructose, tannins and oak. You will build your supplies and equipment as time goes on. Everything I talked about above will take you a level where you can become a dedicated, creative and proud winemaker!
Written by Winemaker Frank Renaldi
Sacrificial tannins 101
Have you heard about sacrificial tannins? If not, read on!
Why we love tannins
As wine drinkers, we love tannins because they help to give structure and mouth feel to a wine. Without it, wines would taste flabby and dull.
As wine makers, we love tannins because they aid in color stabilization, prevent and slow the process of oxidation, and give structure to the wine. Sacrificial tannins can help with this.
Tannins are already present in grapes through their seeds, skins, and stems. We add more tannin through oak aging as well as with oak or tannin alternatives. As fermentation begins, color compounds within the skins bind with proteins, which then drop out of the wine and settle onto the bottom. You can add tannins to white, rose, or red juice.
Tannins gets added as way to give these proteins within the juice extra tannins to bind on to, so that not everything is lost from the juice. This is the role of “sacrificial tannins,” or tannins that you as a a winemaker add in so that you don’t lose any from the grapes themselves.
How do I incorporate sacrificial tannins?
- Use oak chips or oak dust (preferably medium toast) at up to 3 oz per 5 gallons of wine
- FT Rouge for red wines. 5-25g/100 lb fruit. Add at first signs of alcoholic fermentation.
- FT Blanc for white or rose wines. 1-3g/100 lb fruit. Add after it’s been racked off of gross lees.
These can all be added directly to the juice at the onset of fermentation. Just sprinkle it into the juice and incorporate as much as possible, or add to red must right before the first punch down. It will settle to the bottom and can be racked off of at the end of fermentation.
Pressing with rice hulls
Yes – sometimes rice hulls are used for wine making!
Why, you ask?
Well, that’s a great question and we’re here to answer it.
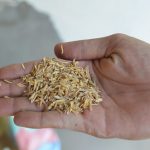
Q: First of all, what are rice hulls, anyway?
A: The husks, or hulls, of rice. It’s the seed coating.
Q: What do they do?
A: They can be used during pressing your grape skins as a way to increase the ease of drainage during the pressing. By incorporating them during the pressing, the size and shape of the hull creates pathways for the otherwise very slippery grape skins to pass through, allowing the free run and the press run to escape with more ease.
Q: Do they impart any flavor or odor?
A: Nope.
Q: How do I use them?
A: Just sprinkle them throughout the grapes as you place them into your press.
A: 50 lbs of rice hulls can be used for 2-6 tons of grapes.
Q: Is it necessary to use them?
A: Absolutely not. However, you will hear about certain home winemakers as well as commercial winemakers who choose to use them. It’s very much a personal preference. To a degree it also depends on the variety you are pressing; some “slip skin” grape varieties can create clogging issues in presses more easily than others. There’s no particular downside to using them if you choose to do so – they will really just make the pressing easier.
Interested in learning more about incorporating rice hulls into your pressing protocol? Stop by Musto Wine Grape or give us a call to learn more about the rice hulls we carry and our experience using them. Happy pressing!
Winemaking with Italian juices
Let’s make wine from Italian juice… at home!
Many winemakers wait all year for their annual Italian juice pickup at Musto. Despite the fact that they may be able to find some of these juices from California, they look forward to knowing that they will be able to make wine that hails from Italy itself.
There’s so many juices to choose from:
- Amarone- cooked cherries, dark plums, cherry liqueur
- Barolo- tannic, rose aroma
- Brunello- cherry, blackberry, tannic
- Chianti- red fruit, dried herbs, herbaceous
- Dolcetto- plum, blackberry, cocoa
- Lambrusco- fruity, blackberry, bright red fruits
- Montepulciano- red plum, thyme, baking spices
- Moscato- sweet, fruity, aromatic
- Nebbiolo- rose, cherry, leather
- Nero D’Avola- cherry, plum, licorice, tobacco
- Pinot Grigio- lemon, lime green apple, bright and crisp
- Sangiovese- tart cherry, strawberry, plum
- Trebbiano- peach, lemon, apple
- Valpolicella- cherry, cinnamon, chocolate
For winemakers who don’t have access to a crusher, destemmer, or press, making wine from Italian juices is a great way to get the joy of making your own wine with less steps and less mess.
So how can you start making your own wine from Italian juices? Follow these steps and you’ll be on your way!
- Choose an Italian variety that speaks to you.
- Come to Musto Wine Grape and pick up your pail of juice.
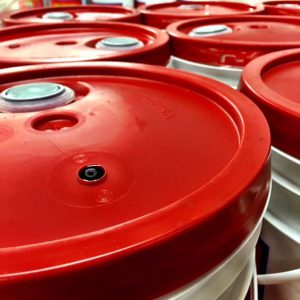
- Bring it home, pop open that lid, and add 1/4 tsp potassium metabisulfite to it. Add pectic enzyme if you’re going to (5 drops per gallon of juice). Give it a stir.
- Allow it to come up to room temperature – we’re talking 60 degrees or so.
- Choose your fermentation vessel: will you keep it in pails or ferment in a carboy or demijohn? Make sure everything is clean and sanitized. *Be sure there is enough room to account for fermentation foaming*
- If you are going to add fermentation tannins or additives (like oak dust, Booster Rouge, Booster Blanc) you can add that now. *Note: do not add tannins such as FT Rouge within 8 hours of adding enzyme*
- Pitch the yeast once the temperature has reached at least 60F. Yeast strain choices will vary depending on the juice you choose – ask a winemaker at Musto Wine Grape for a strain recommendation for the varietal you’re making. Follow the yeast starter directions explicitly. Be very careful of temperatures, never adding yeast if there is more than a 18 degree difference between the yeast starter liquid and the juice.
- Carefully monitor the fermentation by checking Brix levels daily. Add yeast nutrients as needed if you choose to do so.
- If you are adding malolactic cultures to your wine, you may also chose to do this at 1/3 Brix depletion. If using a malolactic nutrient (Opti-Malo Plus) with the bacterial culture, hydrate the nutrient in a separate container from the bacteria and add to the must directly before the addition of the bacteria. Follow all directions on the bacteria and nutrient packets explicitly.
- When the fermentation is complete, rack off the lees and continue aging. Many Italian wines are aged with oak – if you choose to do this, you can do so in oak barrels or with oak alternatives (such as chips or staves).
And there you have it! Delicious Italian wine that you made in your own home. There’s nothing more rewarding than having a glass of wine you made with juice from a reliable source.
Feeling inspired? Come down to Musto Wine Grape and pick up some Italian juice. But don’t wait too long – we are fast approaching the end of harvest time. Pick up everything you need and and be on your way to kicking back as you sip on a glass of homemade Italian wine. Who knows, maybe you’ll even make Frank’s Chicken Fettuccini Alfredo to accompany it!
Muscat: An ancient and beautiful grape variety
Fruity. Floral. Aromatic. Golden. Perfumey. Unique.
Meet Muscat.
What’s so great about this grape? With tons of variations and seemingly even more names, it’s known all over the world for producing an absolutely delicious wine.
It can be made dry, sweet, or even fizzy. With its beautiful floral aromatics (think orange blossom, white flower, honeysuckle) you’re bound to make a wine that impresses!
Muscat Winemaking Recipe
- Crush/destem and press your Muscat into your fermentation vessel
- Add potassium metabisulfite to kill off any native yeast present on the grapes
- Let sit for 12 hours.
- Add Cinn Free and stir well.
- Add Booster Blanc and Opti-White to the juice.
- When the juice reaches about 65 degrees, pitch your yeast. QA23, Vin13 and Alchemy I are good options for keeping the aroma in this wine alive and bright.
- When you see the Brix drop by 2-3, add Fermaid O and mix well.
- Check Brix daily – when Brix drops by 1/3 of the starting number, add Fermaid K
- Rack off gross lees when alcoholic fermentation is complete and add potassium metabisulfite
Helpful tips:
- Don’t lose out on Muscat’s incredible aromatics by exposing it to excessive oxygen. Be sure that as soon as alcoholic fermentation has completed that it’s not sitting out without an airlock.
- Focus on yeasts with the most aromatic potential
- Since this is low acid grape, you’ll want to retain any acidity or semblance of freshness present within the finished wine. Do this by preventing malolactic fermentation from occurring (which can drop the acid) by being sure to add potassium metabisulfite as soon as fermentation ends.
- Consider sweetening your muscat if you’re looking to try making a wine style different than fermenting to dryness.
How to Pick a Press
How to Pick a Press
Which kind is right for you?
One of the most visually iconic and useful tools in winemaking is the wine press. It is the device that will separate the solids and skins from the precious juice or fermented wine. There are a couple different kinds you have to choose from, though they are at their core the same in that they use pressure to push hard against the skins to extract the remaining juice or wine that has not already become separated from the skins.
But upon investing in a wine press, how does one select a size and style? Here are some tips on selecting your first wine press:
Picking a Style
There is more than one way to press a grape! For home winemakers, there are two main styles of wine press that you can choose from: ratchet press or a bladder press.
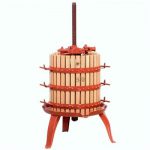
- A ratchet press often has wooden sides and lid that hold in the grape must with a steel center rod and bottom juice tray. The grapes are loaded into the center of the press and large blocks are stacked on top of make up any lost volume. Then the lid is ratcheted down, applying vertical pressure from the top down upon the grapes. This style of press does an excellent job with extraction. The user must be careful not to exert too much pressure on the must as they are liable to crack seeds, which can release bitterness into the wine.
- A bladder press is similar in shape to a ratchet press but operates differently. Bladder presses have metal sides and lids to hold in the grape must along with the traditional metal bottom. They work via water pressure. Simply attach a garden hose to the inlet valve and the water will inflate a center bladder which exerts horizontal pressure against the grape must. This style of press exerts more gentle and even pressure to the grape must. The press must be filled up to the top to avoid “mushrooming” and bursting the center bladder.
Considerations
Choosing a reasonable size
When selecting a new press, the size options can be overwhelming. There are many different sizes of press, often measured in liters. Always take into account the must volume versus your end produced volume. If you anticipate to make 10 gallons of finished wine, you should anticipate on having 12-13 gallons of must, as the skins take up an additional 20% of the volume. You can always fill the press multiple times, but you should average at least an hour per press fill. Rather than do a huge load and then a much smaller one, it is preferable to split up each load so they will be pressed in roughly equal amounts. This will aid in giving the pressed juices/wines more uniformity.
Will your production size increase over time?
Also factor in the possibility of growth when selecting a press size. Winemaking is contagious and you may want to increase your batch size when you begin to drink your delicious results! It’s often wise to purchase a slightly larger ratchet press to accommodate for growth. If you purchase a slightly larger bladder press than what you may currently have for must, you can add rice hulls to the must to increase volume to properly inflate your bladder.
Other considerations
If you’re not a “sanitation is key” winemaker (and hopefully you are!) then a ratchet press may not necessarily be the best of these two choices. Since wood is porous, if you don’t remain cleanly every step of the way, then you may find yourself dealing with some very unwanted spoilage bacteria down the road. Getting a stainless steel bladder press will make it easier for you to be certain that every surface is completely cleaned and sanitized both pre- and post- use.
A wine press is a fundamental tool in home winemaking. It can dramatically increase your yield and quality. Knowledgeable staff at Musto Wine Grape can help you pick out the press that is the right fit for you!
Setting up your stainless steel tank
Once the home winemaker has mastered the art of getting just the right amount of wine into dozens of different sized carboys, they may be wondering if there is an easier way to ferment and bulk age their wine. Enter the stainless steel tank!
While getting a stainless tank may seem like a big next step, it’s likely one of the best decisions you will make, assuming production levels are high enough. If you’re a home winemaker who has a couple carboys sitting in the cellar, your goal probably isn’t a larger tank. But if you’re making anything more than that, it may just make your life that much easier (and fun!)
A variety of sizes
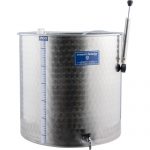
Stainless steel tanks come in many sizes, from 100 liters (26 gallons) to 10,000 liters or more! Unless you’re looking to start their own large scale commercial winery, you’ll likely start your search in the 100L+ range.
Variable capacity or fixed volume
Part of the beauty of stainless tanks is that unlike carboys, demijohns, and barrels, they are oftentimes variable capacity. What does this mean? It means you don’t have to worry about constantly topping up, blending other wines into your batch to allow it to reach the neck of the vessel, the threat of oxidation, or employing inert gas to keep the head space at the top of the vessel blanketed. Some winemakers prefer fixed capacity tanks, but again, the downside is that you really need to stay on top of keeping them full the entire time you’re bulk aging.
Time to set up your stainless steel tank
Setting up your tank is very simple to do. The basic setup will include a stand, valves, tasting valve, and maybe a thermometer and a thermowell. The tank may come with a stand or leveling feet which elevate it from the ground. Even the most simplistic, small tank may come with these, though some will only be basic enough that they get placed directly onto the floor or a pallet. The smallest tanks will not have a manway, since you can easily reach in from the top for cleaning or extracting the juice or must post fermentation. Some will have a valve on the bottom and some will not.
What else might I need to set up on my tank?
-
A manway
-
1 or more valves
-
Sight gauge (plastic tube on side of tank indicating volume in tank)
-
Racking port and drainage port (higher and lower ports, respectively)
-
Gaskets and clamps (most common are 1.5″ / 2″ / 2.5″)
-
Gasket and pump (for variable capacity tank)
Musto Wine Grape is happy to offer a wide range of Marchisio stainless steel tanks, from 100L capacity onward. Come see us and we will be happy to speak with you in detail about what tank is the best for you!
Adding pectic enzyme to your wine
Pectic enzyme at a glance
- AKA pectinase
- A protein that breaks down pectin within fruit
- Added to juice or must pre-fermentation
- No notable downside of using this additive
- Available in powder or liquid form
Right… but why is it important?
- Using pectic enzyme increases juice, tannin, flavor, and color extraction
- Aids in clearing wine by eliminating potential “pectic haze”
Who should use pectic enzyme?
If you’re making wine of any kind, whether from grapes or any other fruit, adding pectic enzyme will be a positive influence on the end result. Both home and commercial winemakers use pectic enzyme as a means of extracting the most they possibly can from their fruit.
When should I add it?
Since it works more slowly after fermentation has completed, add it beforehand. Add at the beginning of fermentation after temperatures have begun creeping up. It works best at around 80F; lower temperatures.
How much do I add?
For white juice/wine, 1-2g/hL. For red must/wine, 2-4g/hL. It comes in either powder or liquid form; depending on the producer the recommended dosage may be different so always be sure to double check the label before making an add.
What happens if I don’t add it?
Simply put, there’s no reason to not add it. Not adding it runs you the risk of having a pectic haze develop. This can be very tricky if not borderline impossible to fix later on; adding pectinase post-fermentation will also not work as well, if at all.
OK, I think I’ve got it now. But can we go over this one more time?
Adding enzyme post-crush/pre-fermentation increases free run juice, color and tannin extraction in both reds and whites, increases filterability and clarification, and lowers chances of pectic haze development. There are many options you can choose from for your pectic enzyme needs, either powder or liquid form.




Recent Comments